Developer Guide
Table of Contents
- Introduction
- Implementation
- Documentation, logging, testing, configuration, dev-ops
- Appendix: Requirements
- Appendix: Instructions for manual testing
Introduction
Welcome to the TutorAid Developer Guide! This document details the key implementations and design considerations that have been incorporated into the development of TutorAid thus far.
Setting up, getting started
Refer to the guide Setting up and getting started.
Acknowledgements
This project is based on the AddressBook-Level3 project created by the SE-EDU initiative.
Design
.puml files used to create diagrams in this document can be found in the diagrams folder. Refer to the PlantUML Tutorial at se-edu/guides to learn how to create and edit diagrams.
Architecture
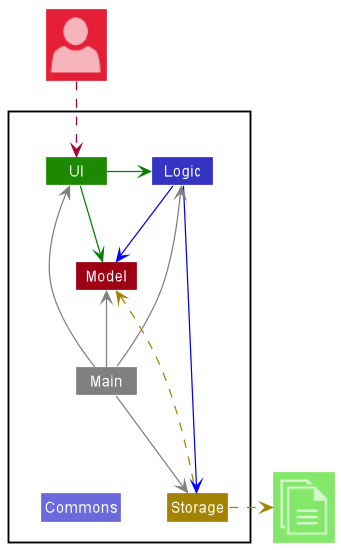
The Architecture Diagram given above explains the high-level design of TutorAid.
Given below is a quick overview of main components and how they interact with each other.
Main components of the architecture
The architecture of TutorAid can first be divided into 6 components: Main, Commons, UI, Logic, Model and Storage
-
Main -
Commons- Represents a collection of classes used by multiple other components.
-
UI- Represents the UI of the App.
-
Logic- Serves as the command executor.
-
Model- Holds the data of the App in memory.
-
Storage- Reads data from, and writes data to, the hard disk.
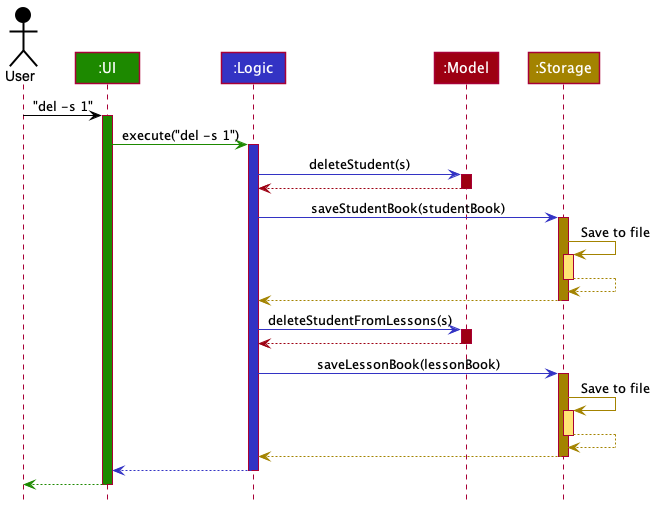
How the architecture components interact with each other
The Sequence Diagram below shows how the components interact with each other for the scenario where the user issues the command del -s 1.
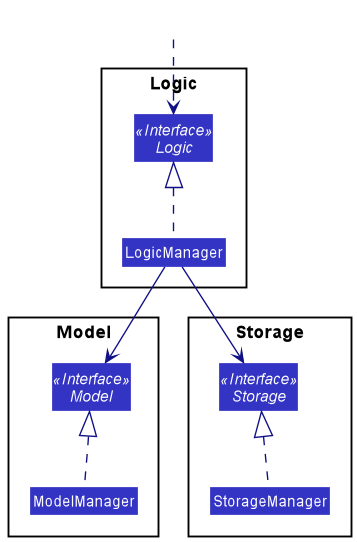
Each of the four main components shown in the diagram above:
- Defines its API in an
interfacewith the same name as the component. - Implements its functionality using a concrete
{Component Name}Managerclass (which follows the corresponding APIinterfacementioned above).
For example, the Logic component defines its API in the Logic.java interface. It also implements its functionality using the LogicManager.java class, which is based on the Logic interface. Other components interact with a given component through its interface rather than the concrete class as illustrated in the (partial) class diagram below. It is designed as such to prevent outside components being coupled to the implementation of a component.
Components
The sections below provide more details on the following components: UI, Logic, Model and Storage.
UI component
The API of this component is specified in Ui.java
The UI component,
- executes user commands using the
Logiccomponent. - listens for changes to
Modeldata so that the UI can be updated with the modified data. - keeps a reference to the
Logiccomponent, because theUIrelies on theLogicto execute commands. - depends on some classes in the
Modelcomponent, as it displaysStudentandLessonobjects residing in theModel.
Here is the UI class diagram:

When taking a closer look at the UI component, notice that the UI consists of a MainWindow that is made up of parts e.g.CommandBox, ResultDisplay, StudentListPanel, LessonListPanel, StatusBarFooter etc. All these, including the MainWindow, inherit from the abstract UiPart class, which captures the commonalities between classes that represent parts of the visible GUI.
The UI component also uses the JavaFx UI framework. The layout of these UI parts are defined in matching .fxml files that are in the src/main/resources/view folder. For example, the layout of the MainWindow is specified in MainWindow.fxml
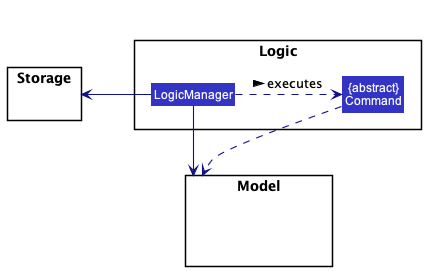
Logic component
API : Logic.java
The Logic component,
- executes users’ commands.
- depends on some classes in the
Modelto modify the current list ofStudentandLessonobjects. - depends on some classes in
Storageto retrieve any relevant and existing data.
Below is the (partial) Logic class diagram that shows the interactions between the different classes within the Logic component:

Here is the class diagram that depicts the Logic component’s dependencies on the Model and Storage components:
When it comes to execution of user commands, the Logic component mainly works in 2 different ways for 2 different types of commands:
Commands with a unique command word
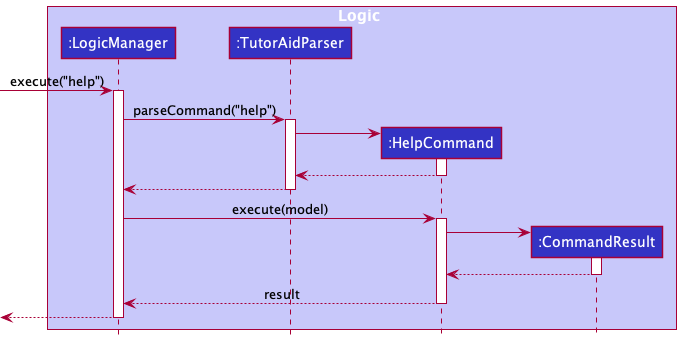
This applies to the commands help, clear and exit.
The Logic component works as such:
- When
Logicis called upon to execute a command, it uses theTutorAidParserclass to parse the user command. - This results in a
Commandobject (or more precisely, an object of one of its subclasses e.g.,HelpCommand), which is executed by theLogicManager. - The command can communicate with the
Modelwhen it is executed (e.g. to open the help window). - The result of the command execution is encapsulated as a
CommandResultobject which is returned fromLogic.
The Sequence Diagram below illustrates the interactions within the Logic component for the execute("help") API call.
Commands with non-unique command word
Commands that have the same command word as (at least) 1 other command is known to have a non-unique command word (e.g. add -s, add -l, add -p and add -sl share the command word add).
This applies to all the commands in TutorAid apart from those mentioned in the section above.
The Logic component works as such:
- When
Logicis called upon to execute a command, it uses theTutorAidParserclass to parse the user command. - The result of the above step is then additionally parsed by another
Parserclass (specifically a class named after a command word e.g.,AddCommandParser). - The parameters of the command are then further parsed by a
Parserclass that is specific to each command (e.g.AddStudentCommandPaser,AddProgressCommandParser, etc.) - A
Commandobject (or more precisely, an object of one of its subclasses e.g.,AddStudentCommand) is then created and is executed by theLogicManager. - The command can communicate with the
Modelwhen it is executed (e.g. to add a student). - The result of the command execution is encapsulated as a
CommandResultobject which is returned fromLogic.
Here’s a Sequence Diagram that illustrates the interactions within the Logic component for the execute("del -s 1") API call.
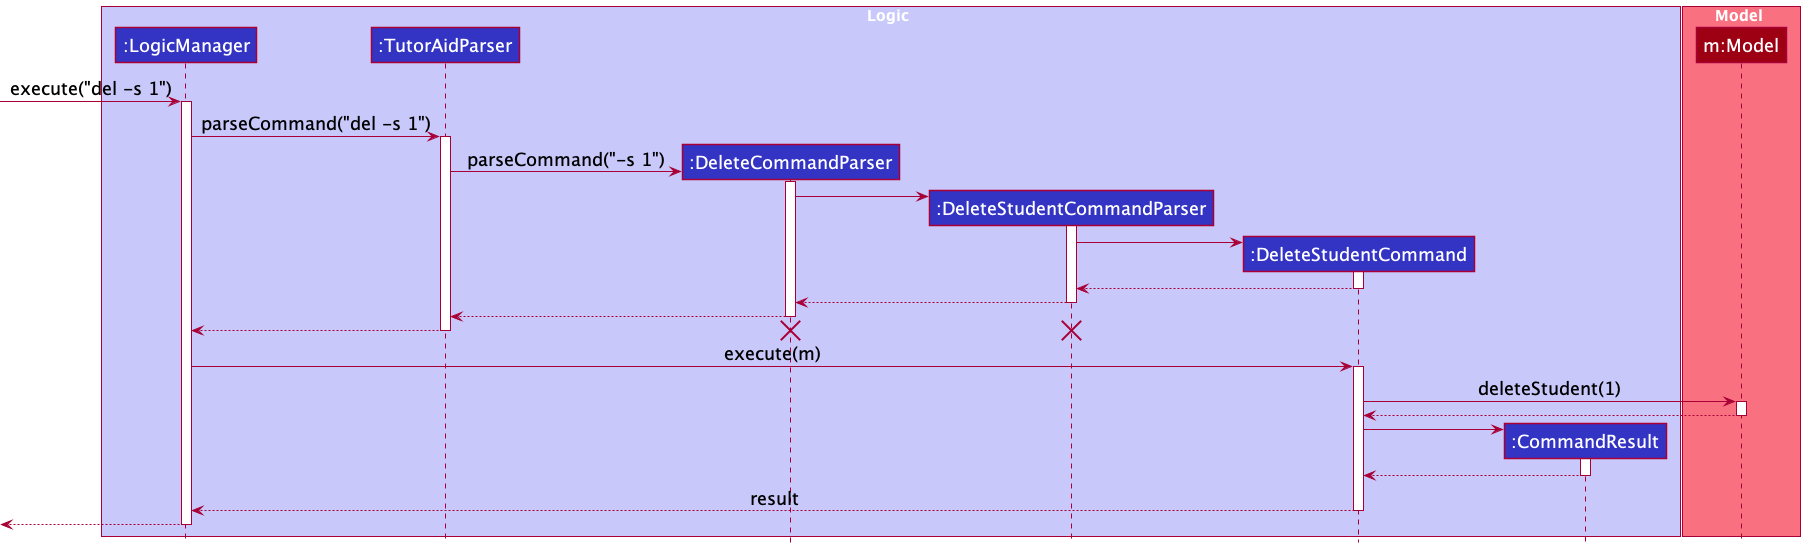
DeleteCommandParserand DeleteStudentCommandParser should end at the destroy marker (X) but due to a limitation of PlantUML, the lifeline reaches the end of diagram.
DeleteStudentCommand object and the objects of the Model class have not been depicted in this diagram as the focus lies in the interactions within the Logic class.
As shown earlier, the process of parsing for commands with non-unique command words differs from those with unique command words as an additional step is required to differentiate between commands that share the same command word.
Below are the other classes in Logic (omitted from the class diagrams above) that are used for parsing a command with non-unique command words:
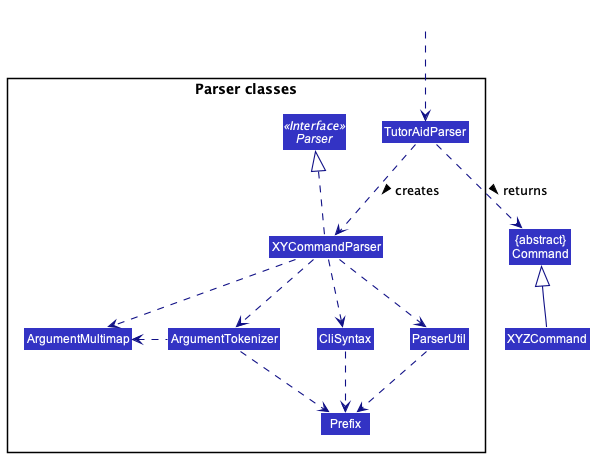
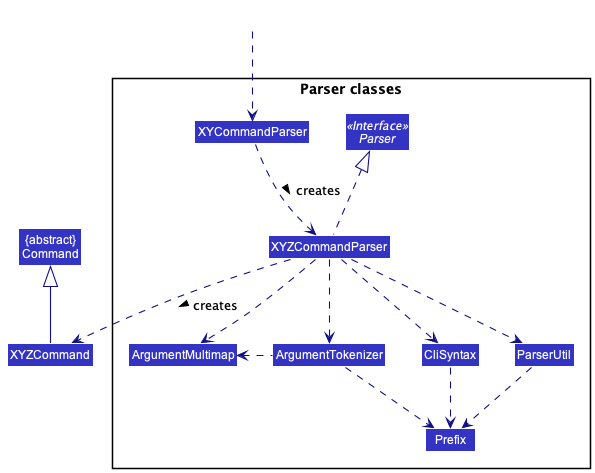
XYCommandParser and XYZCommandParser classes (e.g., AddCommandParser, AddStudentCommandParser, …) inherit from the Parser interface so that they can be treated similarly where possible e.g, during testing
Model component
API : Model.java
The Model component,
- stores the student and lesson data i.e., all
Studentobjects (which are contained in aUniqueStudentListobject) andLessonobjects (which are contained in aUniqueLessonListobject). - stores the currently ‘selected’
Studentobjects (e.g., results of a search query) as a separate filtered list which is exposed to outsiders as an unmodifiableObservableList<Student>that can be ‘observed’ e.g. the UI can be bound to this list so that the UI automatically updates when the data in the list change. This applies toLessonobjects as well. - stores a
UserPrefobject that represents the user’s preferences. This is exposed to the outside as aReadOnlyUserPrefobjects. - does not depend on any of the other three components (as the
Modelrepresents data entities of the domain, they should make sense on their own without depending on other components)
Here is the Model class diagram:
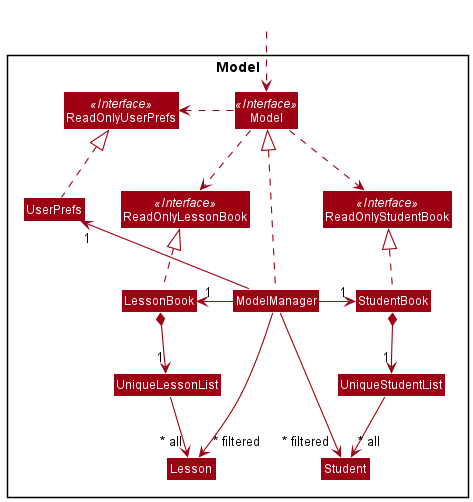
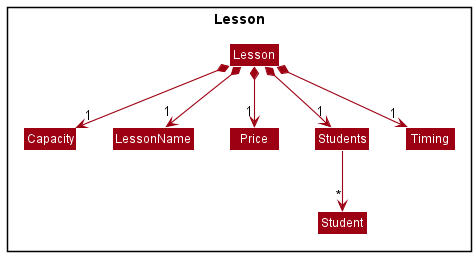
Taking a closer look into Model componenet, each Lesson and Student object also consists of fields as shown in the class diagrams below:

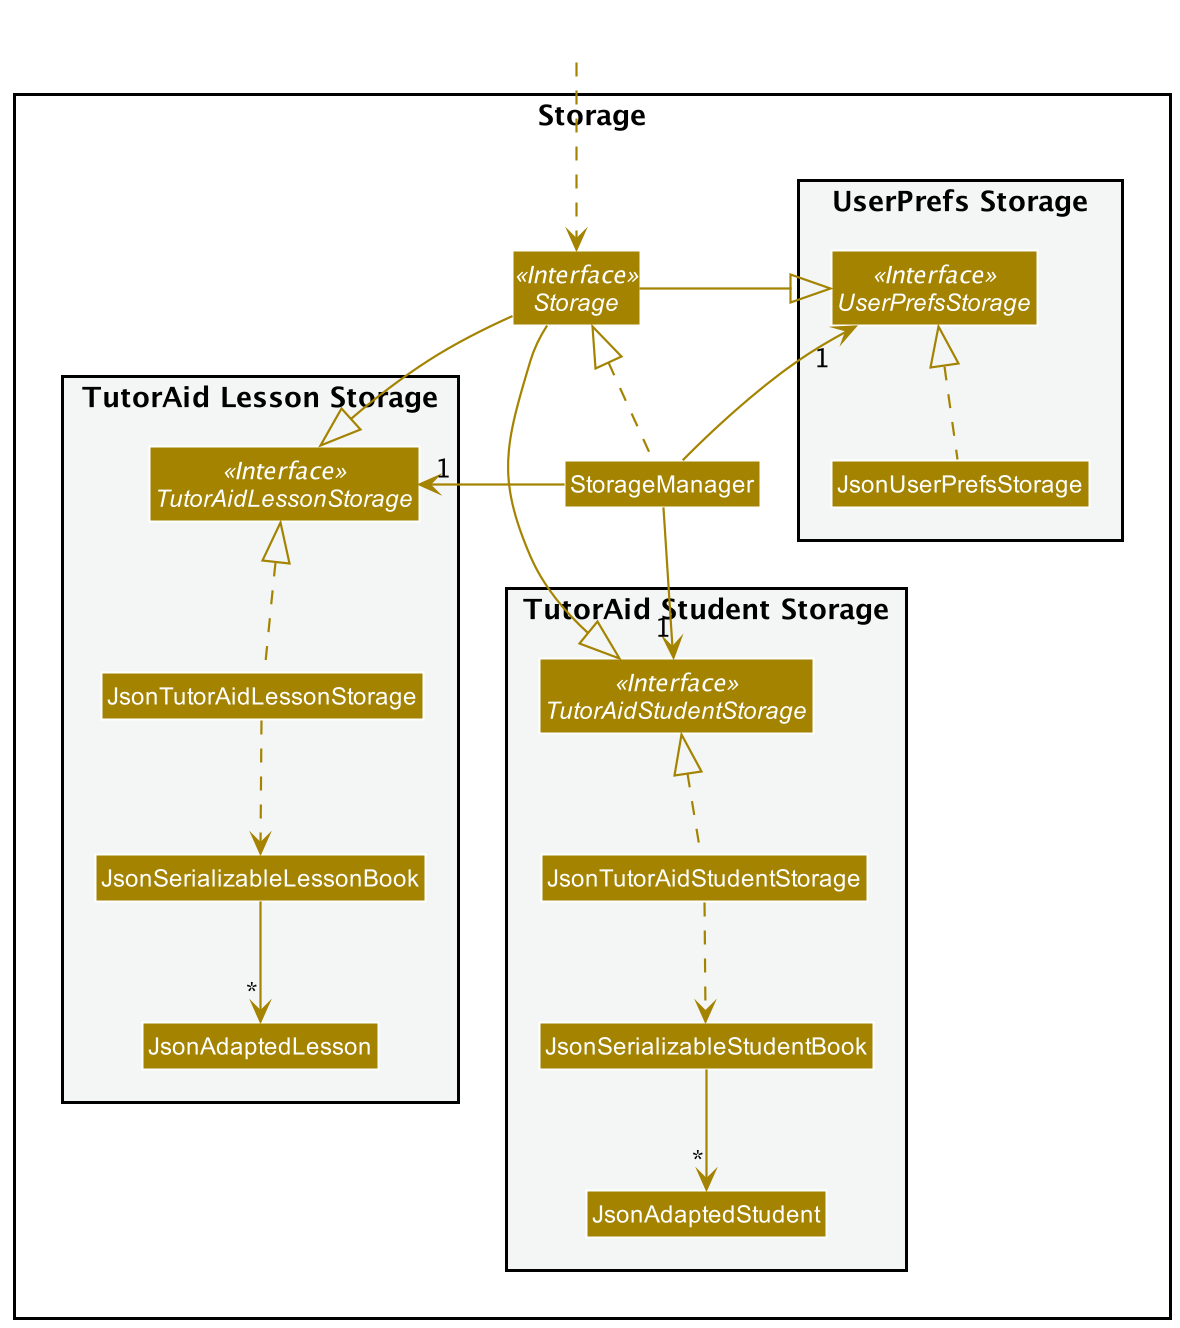
Storage component
API : Storage.java
The Storage component,
- can save students’ data, lessons’ data and user preference data in json format, and read them back into corresponding objects.
- inherits from
TutorAidStudentStorage,TutorAidLessonStorageandUserPrefsStorage, which means it can be treated as either one (if only the functionality of only one is needed). - depends on some classes in the
Modelcomponent (because theStoragecomponent’s job is to save/retrieve objects that belong to theModel)
Below is the Storage class diagram:
Common classes
Classes used by multiple components are in the tutoraid.commons package.
Implementation
This section describes some noteworthy details on how certain features are implemented.
Add student feature
Implementation
This feature adds a student contact to TutorAid. A student contact consists of the student’s name, student’s contact number, the parent’s name and parent’s contact number.
The feature is mainly implemented by the following methods:
-
AddStudentCommand#execute()— Adds aStudentobject to TutorAid.
It is also additionally facilitated by these methods:
-
TutorAidParser#parseCommand()— Checks for the command word that is required for the addition of a student. -
AddCommandParser#parse()— Checks for the command flag that specifies the addition of a student. -
AddStudentCommandParser#parse()— Parses the individual arguments to create aStudentobject. -
ModelManager#addStudent()— Represents the in-memory model of TutorAid’s student book data. -
StudentBook#addStudent()— Adds a student to TutorAid’s student book.
Given below is an example of what happens when the user attempts to add a student contact to TutorAid by entering the command add -s sn/John Doe …:
-
The command is first passed into
TutorAidParser#parseCommand(), which extracts the first keyword (also known as the command word) of every command. Since the keywordaddwould be extracted, the remaining arguments of the command (-s sn/John Doe …) are passed then intoAddCommandParser#parse(). -
AddCommandParser#parse()extracts the command flag-sat the start of its argument, which denotes the addition of aStudentobject. Thus, the remainder (sn/John Doe …) is passed intoAddStudentCommandParser#parse(). -
Each of the different arguments of student contact, such as the student name, student contact number, parent name and parent number, is parsed by
AddStudentCommandParser#parse()based on the given input.
AddStudentCommandParser#parse() detects that no student name has been supplied, the command will fail its execution and ParseException will be thrown.
- For optional parameters, which are all parameters other the student’s name, if the argument is not supplied by the
user, a default argument (
"") is instead supplied by theAddStudentCommandParser#parse().
Below is the sequence diagram that depicts the parsing of the add -s command:
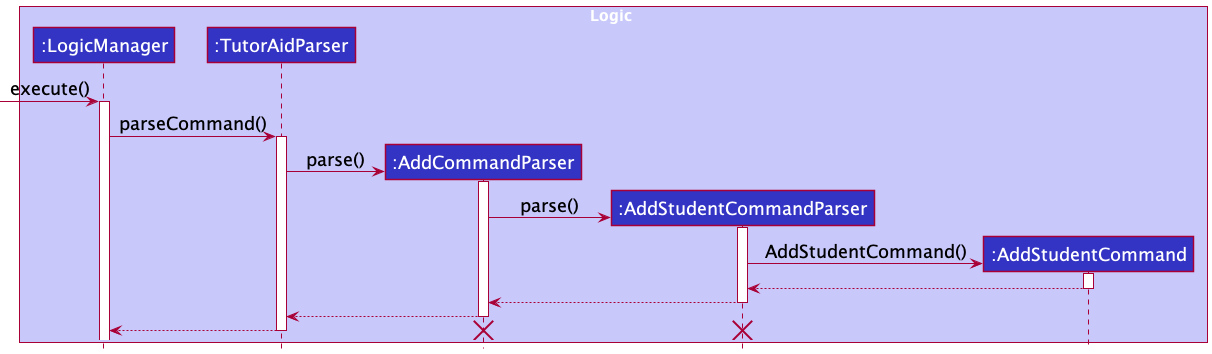
AddCommandParserand AddStudentCommandParser should end at the destroy marker (X) but due to a limitation of PlantUML, the lifeline reaches the end of diagram.
-
The individual arguments are then passed into
Model#Student()to create aStudentobject. -
The
AddStudentCommand#execute()is called upon to add the student into TutorAid. This in turn calls onModelManager#addStudent()andStudentBook#addStudent()to store the details of the new student contact in memory. -
Lastly, a
CommandResultobject is returned to notify the user that the student has been successfully added.
Student object created appears to be a duplicate of an existing Student object, the new Student object will not be stored in TutorAid and user will be alerted of the duplicate instead. (A Student object is said to be a duplicate if it has the exact same student name as an existing Student object).
Below is the sequence diagram that depicts the adding of a newly created Student object to TutorAid:
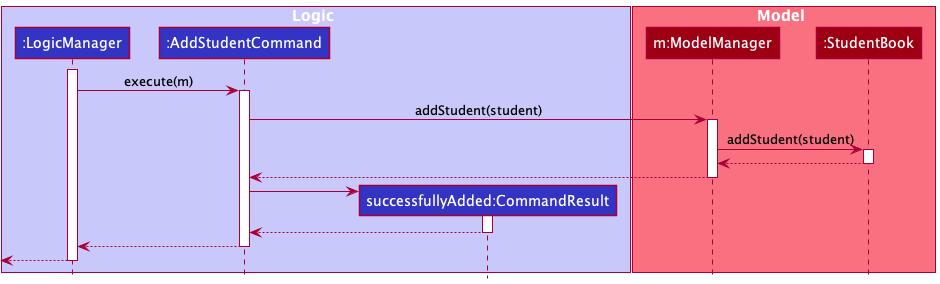
Design considerations
Aspect: How to differentiate the add -s command from other add commands:
-
Alternative 1 (current choice): The
addcommand word and-scommand flag are parsed one after another, in two different classes.- Pros: Better use of abstraction and application of the Single Responsibility Principle, where one class only extracts the command word and another class extracts the command flag.
- Cons: Time taken to execute the command may increase as more classes and methods are required to execute it.
-
Alternative 2: The
addcommand word and-scommand flag are parsed in the same class, by the same method.- Pros: Command can be executed quickly as only one method is required to parse the command. Increases cohesion as well.
- Cons: Having a single parse method may result in the method having multiple responsibilities in order to parse various components of a command, such as the command word, command flag and arguments. Any changes in any of the command components also results in changing this whole
Parseclass, making it more difficult to maintain.
Add a progress entry to a student feature
Implementation
The add progress to a student feature adds a progress entry to an existing student in TutorAid. Each student can have up to 10 progress entries. Adding a new entry to a student who already has 10 such entries will result in the deletion of the oldest entry.
This feature implements the following operations:
-
AddProgressCommand#execute()— Creates aProgressobject and adds it to aProgressListobject of aStudentobject in TutorAid.
It is also facilitated by the methods below:
-
TutorAidParser#parseCommand()— Checks for the command word that is required for the addition of a progress entry. -
AddCommandParser#parse()— Checks for the command flag that specifies the addition of a progress entry. -
AddProgressCommandParser#parse()— Parses the individual arguments to create aProgressobject.
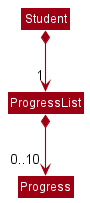
When a Student object is created, a ProgressList object is created for this Student object. This ProgressList object stores an ArrayList of type Progress that keeps track of a maximum of 10 Progress objects. We implement ProgressList as a field in Student.
Given below is an example of what happens when the user attempts to add a progress entry to a student in TutorAid by entering a command add -p 2 Did Homework:
Below is the sequence diagram that depicts the parsing of the add -p 2 Did Homework command:
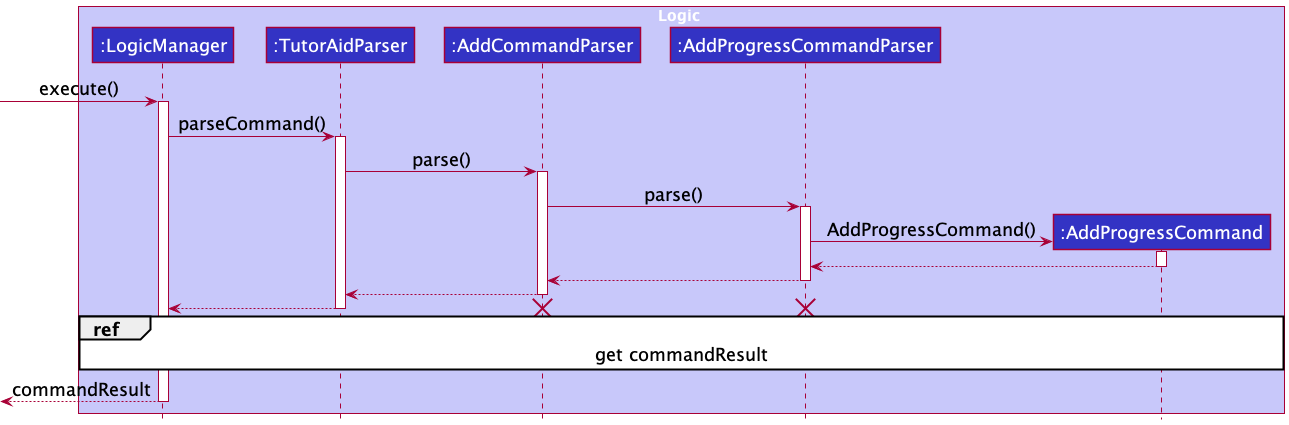
AddCommandParserand AddProgressCommandParser should end at the destroy marker (X) but due to a limitation of PlantUML, the lifeline reaches the end of diagram.
-
LogicManager#execute()is executed, where the above user input is passed intoTutorAidParser#parseCommand(). -
TutorAidParser#parseCommand()then extracts the first keyword (also known as the command word) of every command. Since the keywordaddwould be extracted, the remaining arguments of the command (-p 2 Did Homework) are then passed intoAddCommandParser#parse(). -
AddCommandParser#parse()extracts the command flag-pat the start of its argument, which denotes the addition of a progress. Thus, the remaining (2 Did Homework) is then passed intoAddProgressCommandParser#parse(). -
The remainder (
2 Did Homework) is then parsed into targetIndex2and progress with the descriptionDid Homework, which are then used to construct anAddProgressCommandobject that will be returned toLogicManager.
AddProgressCommandParser#parse() detects that invalid input has been supplied, the command will fail its execution and ParseException will be thrown.Below is the sequence diagram that depicts how AddProgressCommand gets the student to edit and then add the progress to the student:
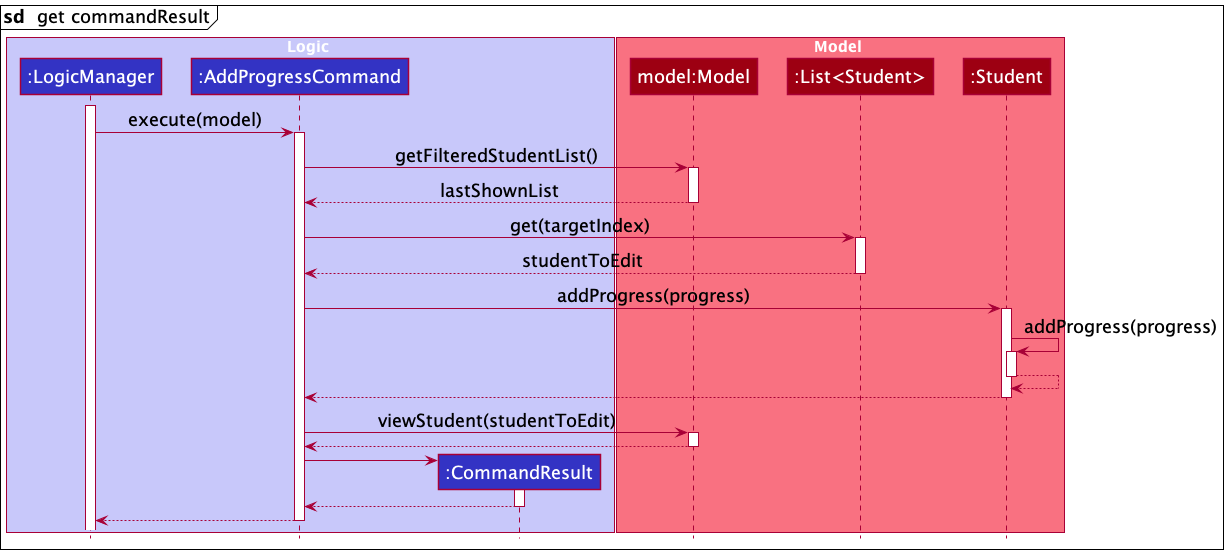
-
LogicManager#execute()then calls uponAddProgressCommand#execute(). It communicates with theModelto get the index-specifiedStudentinstance. -
AddProgressCommandcalls theStudent#addProgress()to add the new progress to the specified student. -
AddProgressCommandthen calls theModel#viewStudent()to signal toModelto view this student’s details. -
The result of the
AddProgressCommandexecution is then encapsulated as aCommandResultobject, which is returned toLogicManagerand then returned to the user.
Design considerations
Aspect: How to keep track of all the progress entries of a student:
-
Alternative 1 (current choice): Implements a ProgressList class.
- Pros: Abstracts away the management of progress from the
Studentclass. - Cons: Potentially more dependency.
- Pros: Abstracts away the management of progress from the
-
Alternative 2: Implements an
ArrayListof typeProgressin theStudentclass.- Pros: Easier to implement.
- Cons: Student class may have too many responsibilities.
Add lesson feature
Implementation
This feature adds a lesson to TutorAid. A lesson consists of the lesson name, capacity, pricing, timing and student list.
This feature implements the following operations:
-
AddLessonCommand#execute()— Adds aLessonobject to TutorAid.
This feature is additionally facilitated by the following operations:
-
TutorAidParser#parseCommand()— Checks for the command word that is required for the addition of a lesson. -
AddCommandParser#parse()— Checks for the command flag that specifies the addition of a lesson. -
AddLessonCommandParser#parse()— Parses the arguments provided to create aLessonobject.
To represent a lesson and its details, a Lesson class is introduced. Its class diagram can be seen below:

Given below is an example usage scenario for adding a lesson to TutorAid, and how the command is executed.
-
The user executes
add -l n/Maths 1 c/15to add a lesson namedMaths 1which has a capacity of15to TutorAid.LogicManager#execute()is executed, where the user input is passed intoTutorAidParser#parseCommand(). -
This in turn calls
AddCommandParser#parse(), where the string-l n/Maths 1 c/15is passed in as the argument. Due to the command flag-lat the start of the argument,AddLessonCommandParser#parse()is called to parse the remaining parametersn/Maths 1 c/15into lesson details.
AddLessonCommandParser#parse() detects that no lesson name has been supplied, the command will fail its execution and ParseException will be thrown.
-
The original arguments (
Maths 1and15) are used for the parameterslessonNameandcapacityrespectively. Since the optional parameters (priceandtiming) are not provided in the command, a default argument ("") is supplied for these parameters. These parameters are then used to createLessonName,Price,CapacityandTiminginstances. -
These individual instances, along with a
Studentsobject containing an emptyArrayList<Student>, are then used to create aLessonobject. ThisLessoninstance is used to create aAddLessonCommandobject.
Below is the sequence diagram that depicts the parsing of the command add -l n/Maths 1 c/15, and the instantiation of the AddLessonCommand object.

AddCommandParserand AddLessonCommandParser should end at the destroy marker (X) but due to a limitation of PlantUML, the lifeline reaches the end of diagram.
-
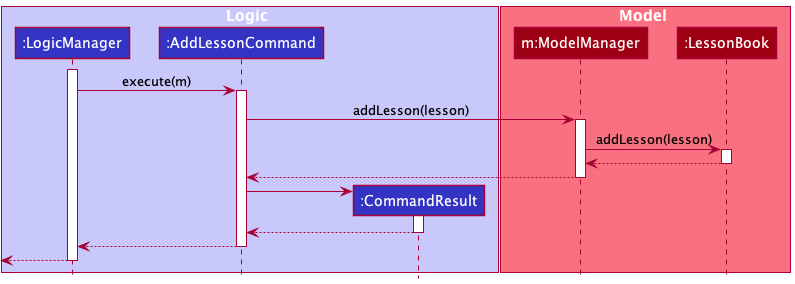
AddLessonCommand#execute()is then called to add the lesson to TutorAid.
-
This in turn calls on
ModelManager#addLesson()andLessonBook#addLesson()to store the details of the new lesson in memory. -
A
CommandResultobject is then created and returned to notify the user that the lesson, with the specified details, has been successfully added to TutorAid.
Below is the sequence diagram that depicts the adding of the newly created Lesson object to TutorAid:
View student/lesson feature
Implementation
The proposed view student/lesson mechanism is facilitated by ModelManager. It implements Model, stored internally as a modelManagerStateList and currentStatePointer. Additionally, it implements the following operations:
-
ModelManager#viewStudent()— Updates the Student Panel with the student of interest, and the Lesson Panel with the lessons the student of interest is enrolled in. -
ModelManager#viewLesson()— Updates the Lesson Panel with the lesson of interest, and the Student Panel with the students that are enrolled in this lesson of interest.
This operation is exposed in the Model interface as Model#viewStudent() and Model#viewLesson().
Given below is an example usage scenario and how the ‘view student’ mechanism behaves at each step.
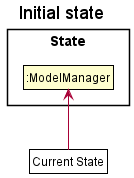
- The user launches the application for the first time. The
ModelManagerwill be initialized with the initial model manager state, and thecurrentStatePointerpointing to that single model manager state.
- The user executes
view -s 1command to view the 1st student in the Student Panel in TutorAid. Theview -scommand callsModel#viewStudent(), causing the modified state of model manager after theview -s 1command executes to be saved in themodelManagerStateList, and thecurrentStatePointerpointing to that model manager state.
The following sequence diagram shows how the view student operation works:
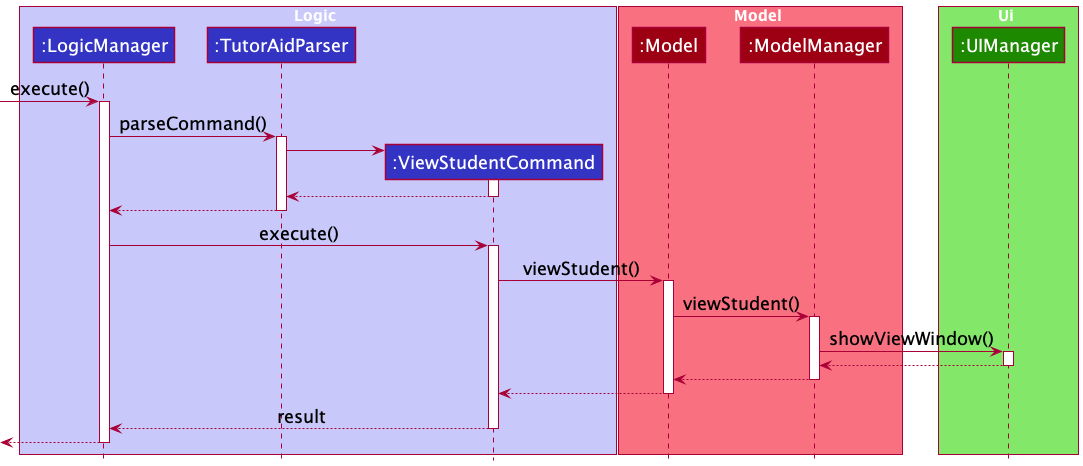
A similar execution scenario can be expected for ‘view lesson’ mechanism.
Design considerations
Aspect: How ‘view student’/’view lesson’ commands are executes:
-
Alternative 1 (current choice): Filters and updates view panel on command.
- Pros: Easy to implement.
- Cons: May have performance issues in terms of memory usage.
-
Alternative 2: Filter list beforehand and update view panel on command.
- Pros: Will use less memory (e.g. for
view -s, just load the pre-generated student panel). - Cons: We must ensure that all possible view panels combinations are covered and this might cause slower application initialization.
- Pros: Will use less memory (e.g. for
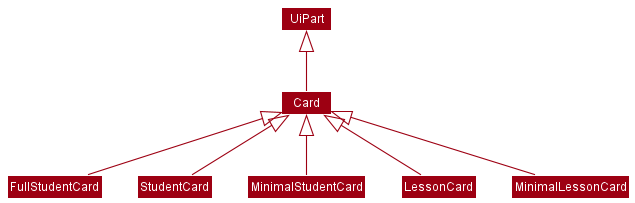
Card-like UI Elements
Card-like UI elements are objects that are shown to the user in their respective list panels, such as the StudentCard that is displayed in the StudentListPanel. The Student Cards come in three flavours: FullStudentCard displays all fields to the user, StudentCard is the same but only displays the most recent Progress entry, and MinimalStudentCard only displays the index and the student’s name. Lesson Cards come in 2 flavours: LessonCard (fully-detailed) and MinimalLessonCard (only index, name and timing). Having minimally-detailed variants keeps the list compact and allows the user to view more entries at a time.
These UI elements inherit the Card class, which in turn inherits UiPart<Region>.
At all times, the LessonListPanel and StudentListPanel in the MainWindow will display Lessons and Students from the model using either the fully-detailed or minimal Card objects. The variant being displayed depends on the user command: list -a will cause both panels to display all details (only the latest entry is shown for student progress) while list will cause both panels to display only minimal details. Most other commands that affect the Model will cause all information to be displayed, especially for edited components.
The two panels are kept in sync: Lessons displayed in the LessonListPanel are those that are attended by Students displayed in the StudentListPanel.
There are thus three static instances of StudentListPanel and two of LessonListPanel - one for each variant. Every time the Model is updated, MainWindow#fillStudentCard() and MainWindow#fillLessonCard() will be called to ensure that the correct variant is displayed in the MainWindow. The sequence diagram below shows how this works:
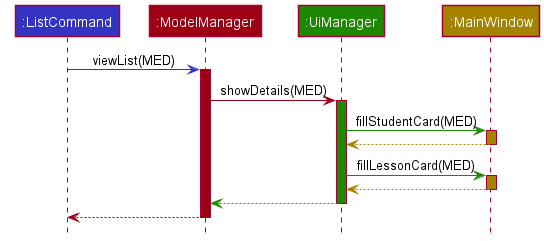
When fillStudentCard(DetailLevel.MED) or fillLessonCard(DetailLevel.MED) are called during the execution of a list -a command, the studentListPanelPlaceholder and lessonListPanelPlaceholder in MainWindow are cleared of its nodes to prepare them to accept new nodes (panels). Then, the correct studentListPanel and lessonListPanel with all details are inserted, thus displaying the fully-detailed panels (minus the full Progress of the Student objects) to the user.
Conversely, if a user chooses to hide the details by executing list, UiManager#showDetails(DetailLevel.LOW) will be called instead, which will call fillStudentCard(DetailLevel.LOW) and fillLessonCard(DetailLevel.LOW) and hide the details.
The FullStudentCard is only used for the view command, in which the user wishes to view only a specific Student and their corresponding Lessons / Lesson and its corresponding Students. Then, all fields are displayed, including the 10 most recent Progress entries for each Student.
The above applies to the scenario when the user inputs a command which calls a method that changes the detail visibility of the cards. In contrast, during the application launch, MainApp calls the start method of UiManager which calls MainWindow#fillInnerParts(). The details are shown below:
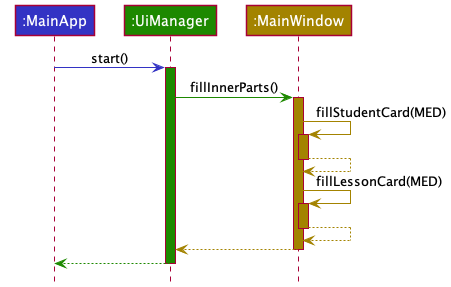
The panels default to StudentCard and LessonCard for the application launch, thus showing most details to the user but not the complete list of Progress entries.
Add student(s) to lesson(s) feature
Implementation
This feature adds existing student(s) into existing lesson(s) in TutorAid. The feature also allows the addition of multiple students into multiple lessons in a single command. For each student-lesson pair, if the student has already been added to the lesson in TutorAid, a warning will be given. Otherwise a success message will be shown. This means that there can be simultaneously many warnings and success messages after one single AddStudentToLessonCommand.
This feature implements the following operations:
-
AddStudentToLessonCommand#execute()— Adds some existingStudentobjects to some existingLessonsobjects and vice-versa.
It is also facilitated by the methods below:
-
TutorAidParser#parseCommand()— Checks for the command word that is required for the addition of students into lessons. -
AddCommandParser#parse()— Checks for the command flag that specifies the addition of students into lessons. -
AddStudentToLessonCommandParser#parse()— Parses the individual arguments to create twoArrayLists ofIndex, one for student indexes and the other for lesson indexes.
Given below is an example of what happens when the user attempts to add some students into some lessons in TutorAid by entering a command add -sl s/1 2 3 l/3 2 1:
Below is the sequence diagram that depicts the parsing of the add -sl command:
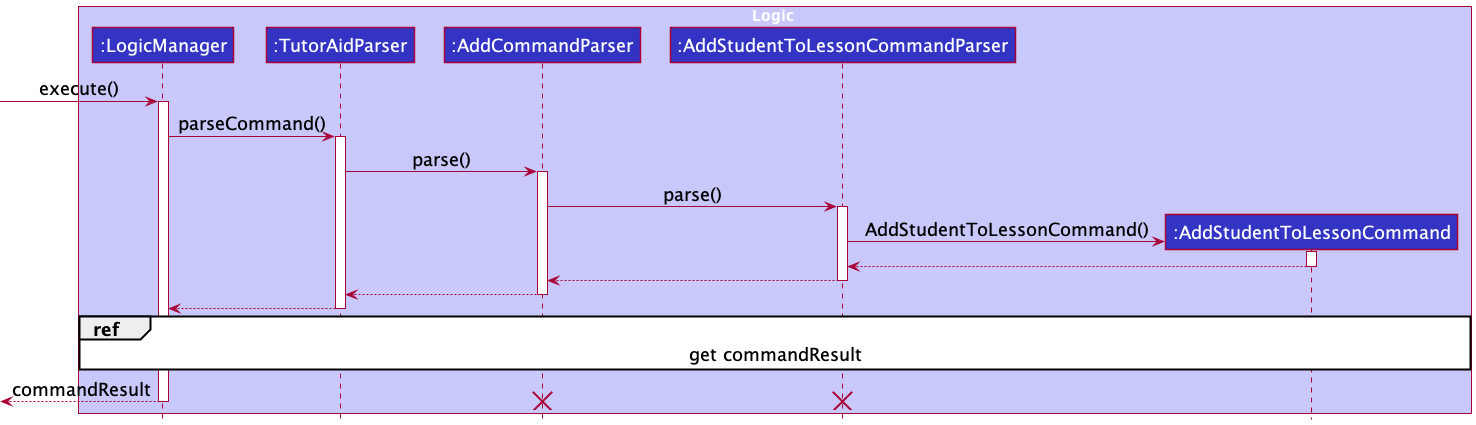
AddCommandParserand AddStudentToLessonCommandParser should end at the destroy marker (X) but due to a limitation of PlantUML, the lifeline reaches the end of diagram.
-
LogicManager#execute()is executed, where the above user input is passed intoTutorAidParser#parseCommand(). -
TutorAidParser#parseCommand()then extracts the first keyword (also known as the command word) of every command. Since the keywordaddwould be extracted, the remaining arguments of the command (-sl s/1 2 3 l/3 2 1) are then passed intoAddCommandParser#parse(). -
AddCommandParser#parse()extracts the command flag-slat the start of its argument, which denotes the addition of students into lessons. Thus, the remaining (s/1 2 3 l/3 2 1) is then passed intoAddStudentToLessonCommandParser#parse(). -
The remainder (
s/1 2 3 l/3 2 1) is then parsed into twoArrayLists ofIndex(studentIndexesandlessonIndexes), which are then used to construct anAddStudentToLessonCommandobject that will be returned toLogicManager.
AddStudentToLessonCommandParser#parse() detects that invalid input has been supplied, the command will fail its execution and ParseException will be thrown.Below is the sequence diagram that depicts how AddStudentToLessonCommand gets the students and the lessons and then add these students into the lessons:
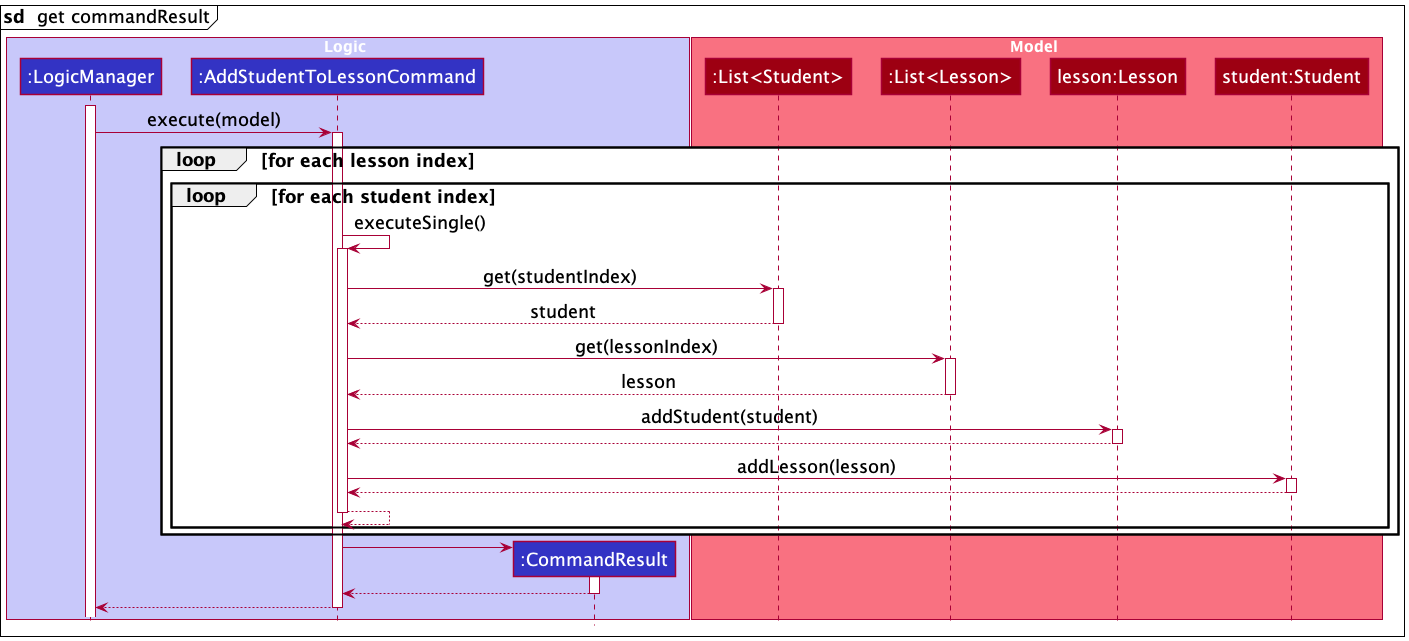
-
LogicManager#execute()then calls uponAddStudentToLessonCommand#execute(). It then loops through each studentIndex-lessonIndex pair and call another method of its ownAddStudentToLessonCommand#executeSingle()to communicates with theModelto get the index-specifiedStudentinstance andLessoninstance. -
For each student-lesson pair,
AddStudentToLessonCommand#executeSingle()calls theLesson#addStudent()to add the student to the lesson andStudent#addLesson()to add the lesson to the student, if the student is not currently added to the lesson. -
After going through all the student-lesson pairs, the result of the
AddStudentToLessonCommandexecution is then encapsulated as aCommandResultobject, which is returned toLogicManagerand then returned to the user.
Design considerations
Aspect: How to add students into lessons:
-
Alternative 1 (current choice): Adds many students to many lessons at once.
- Pros: More convenient for typing.
- Cons: More complicated to implement.
-
Alternative 2: Add a single student to a single lesson each time.
- Pros: Easier to implement.
- Cons: Not fast and friendly for typing.
Documentation, logging, testing, configuration, dev-ops
Listed below are guides that provide a thorough documentation of the other aspects of TutorAid:
Appendix: Requirements
Product scope
Target user profile
A private tutor that:
- has a need to manage a significant number of students’ details
- prefers desktop apps over other types
- can type fast
- prefers typing to mouse interactions
- is reasonably comfortable using CLI apps
Value proposition: TutorAid helps private tutors manage the details of their students and lessons faster than a typical mouse/GUI driven app.
User stories
Priorities: High (must have) - * * *, Medium (nice to have) - * *, Low (unlikely to have) - *
| Priority | As a … | I want to … | So that I can… |
|---|---|---|---|
* * * |
tutor | add student contacts with ease | keep up with a changing list of students |
* * * |
tutor | delete student contacts with ease | keep up with a changing list of students |
* * * |
tutor | add students into multiple classes in TutorAid | record students who are taking more than 1 of my classes |
* * * |
tutor | view my students’ parents’ contacts | update them on their children’s progress |
* * * |
tutor who teaches students with differing academic strengths | update the progress of my students | ensure that each student is being appropriately challenged |
* * * |
tutor with many students to keep track of | record feedback of each student in the app after each class | recall any important details or information when giving feedback to parents on their child’s performance |
* * * |
tutor with many students in each class | to view which students are in my current class | know who is absent and contact them |
* * |
tutor | edit the students in each class | record any changes in the classes that each of my students attend |
* * |
tutor who allows the enrollment of new students throughout the year | set the student capacity for each class | check which of the classes new students are able to join |
* * |
tutor who prices lessons for different classes at different rates | record an individual price for each class | track how much each of my students need to pay at the each month |
* * |
tutor | check which student has not paid | remind the student to make the payment soon |
* * |
private tutor who may provide ad-hoc lessons to some of my students | track the number of lessons I provide for each student | ensure that I receive the correct payment from each student at the end of each month |
* * |
caring tutor | track my students’ submissions and grades | study how they have doing |
* * |
tutor | check if my students have any upcoming milestones | prepare the relevant materials for my students (e.g. past year papers / cheat sheets) |
* * |
tutor | set up a to-do list for every lesson | record what I need to cover for every lesson |
* * |
tutor | add the topics to be covered for the next few weeks for each class | plan the lessons for future weeks ahead of time |
* * |
tutor with many classes to keep track of | check my tasks for the day | refresh my memory of what needs to be done for each class |
* * |
tutor with a different schedule every day | easily access my schedule for the day and week ahead | manage my time well |
* * |
tutor | able to view when I have last updated the progress for each student | ensure that I consistently update progress for all students |
* * |
new user | to be able to easily access and refer to the command guide | quickly and easily add details to the database without having prior experience of doing so |
* * |
forgetful tutor | check for the TutorAid commands fast | conveniently operate the app |
* |
expert user | bulk-edit my students’ details | easily transit into the next school year |
Use cases
(For all use cases below, the System is the TutorAid and the Actor is the tutor, unless specified otherwise)
Use cases that have been added to TutorAid
Use Case 1: Add a student
MSS
- Tutor requests to add a student by passing all the relevant student details to TutorAid, such as the student’s name and phone number.
- TutorAid adds the student and displays a message indicating that this has been done.
Use case ends.
Extensions
- 1a. TutorAid detects that the command keyed in is incorrect. (e.g. wrong format, missing/invalid arguments)
- 1a1. TutorAid displays an error message and requests the tutor to re-enter the command.
- 1a2. Tutor re-enters the command, along with the necessary arguments.
Steps 1a1-1a2 are repeated until the data entered is correct.
Use case resumes from Step 2.
- 1b. Tutor realises that they added the student’s details wrongly.
- 1b1. Tutor deletes the student (UC02) who was just added.
Use case resumes from Step 2.
- 1c. The list is empty.
Use case ends.
Use Case 2: Delete a student
MSS
- Tutor requests to list all students.
- TutorAid shows the list of all students.
- Tutor identifies the index of the student that is to be deleted in the list, and requests to delete the student at this index from TutorAid.
- TutorAid successfully deletes the student corresponding to the given index and displays a message to indicate this.
Use case ends.
Extensions
- 1a. TutorAid detects an error in the list command.
- 1a1. TutorAid displays an error message and requests the tutor to re-enter the command.
- 1a2. User re-enters the command.
Steps 1a1-1a2 are repeated until the command entered is correct.
- 1b. The list is empty.
Use case ends.
Use case resumes from Step 2.
- 3a. TutorAid detects that the command keyed in is incorrect. (e.g. wrong format, missing arguments, invalid index)
- 3a1. TutorAid displays an error message and requests the tutor to re-enter the command.
- 3a2. Tutor re-enters the command, along with the necessary arguments.
Steps 3a1-3a2 are repeated until the command entered is correct.
Use case resumes from Step 4.
Use case 3: View a student’s details
Pre-condition: The student contact (that contains the details) currently exists in TutorAid.
MSS
- Tutor requests a list of students.
- TutorAid shows the list of the students.
- Tutor identifies the index of a specific student in the list and requests to view the details of the student at this index.
- TutorAid displays all the details of the student corresponding to the given index.
Use case ends.
Extensions
- 1a. TutorAid detects an error in the list command.
- 1a1. TutorAid displays an error message and requests the tutor to re-enter the command.
- 1a2. User re-enters the command.
Steps 1a1-1a2 are repeated until the command entered is correct.
Use case resumes from Step 2.
- 1b. The list is empty.
Use case ends.
- 3a. TutorAid detects that the command keyed in is incorrect. (e.g. wrong format, missing arguments, invalid index)
- 3a1. TutorAid displays an error message and requests the tutor to re-enter the command.
- 3a2. Tutor re-enters the command, along with the necessary arguments.
Steps 3a1-3a2 are repeated until the command entered is correct.
Use case resumes from Step 4.
Use Case 4: Edit a student’s details
Pre-condition: The student’s contact currently exists in TutorAid.
MSS
- Tutor requests a list of students.
- TutorAid shows the list of the students.
- Tutor identifies the index of a specific student in the list and requests to edit the details of the student at this index by providing the updated details.
- TutorAid updates the details and displays all the latest information of the student corresponding to the index, along with a message to indicate that the update has been done.
Extensions
- 1a. TutorAid detects an error in the list command.
- 1a1. TutorAid displays an error message and requests the tutor to re-enter the command.
- 1a2. User re-enters the command.
Steps 1a1-1a2 are repeated until the command entered is correct.
Use case resumes from Step 2.
- 1b. The list is empty.
Use case ends.
- 3a. TutorAid detects that the command keyed in is incorrect. (e.g. wrong format, missing arguments, invalid index)
- 3a1. TutorAid displays an error message and requests the tutor to re-enter the command.
- 3a2. Tutor re-enters the command, along with the necessary arguments.
Steps 3a1-3a2 are repeated until the command entered is correct.
Use case resumes from Step 4.
Use Case 5: Add a progress note to a student
Pre-condition: The student’s contact currently exists in TutorAid.
MSS
- Tutor requests a list of students.
- TutorAid shows the list of the students.
- Tutor identifies the index of a specific student in the list and requests to add a progress note to the student at this index by providing the details that are to be added in the note.
- TutorAid adds the progress note to the student corresponding to the given index and displays a message to indicate that it has done it.
Extensions
- 1a. TutorAid detects an error in the list command.
- 1a1. TutorAid displays an error message and requests the tutor to re-enter the command.
- 1a2. User re-enters the command.
Steps 1a1-1a2 are repeated until the command entered is correct.
Use case resumes from Step 2.
- 1b. The list is empty.
Use case ends.
- 3a. TutorAid detects that the command keyed in is incorrect. (e.g. wrong format, missing arguments, invalid index)
- 3a1. TutorAid displays an error message and requests the tutor to re-enter the command.
- 3a2. Tutor re-enters the command, along with the necessary arguments.
Steps 3a1-3a2 are repeated until the command entered is correct.
Use case resumes from Step 4.
Use Case 6: Delete a progress note from a student
Pre-condition: The student’s contact currently exists in TutorAid.
MSS
- Tutor requests to view the details of a specific student(UC03).
- TutorAid displays the details of that specific student, including all the past progress notes added for that student.
- Tutor identifies the index of a specific note in that list, and requests to delete this progress note from this student by passing in both the indices of the student and the note.
- TutorAid deletes the progress note from the student corresponding to the given index and displays a message to indicate that it has been done.
Extensions
- 3a. TutorAid detects that the command keyed in is incorrect. (e.g. wrong format, missing arguments, invalid indexes).
- 3a1. TutorAid displays an error message and requests the tutor to re-enter the command.
- 3a2. Tutor re-enters the command, along with the necessary arguments.
Steps 3a1-3a2 are repeated until the command entered is correct.
Use case resumes from Step 4.
- 4a. TutorAid detects that the student does not have any progress note.
- 4a1. TutorAid displays a warning message that this student does not have any existing progress note.
Use case ends.
Use case 7: Set up a lesson
Preconditions: The students of the class have been added to TutorAid.
MSS
- Tutor requests to add a class by providing the details of the class, such as the lesson time and price.
- TutorAid creates the class and displays a message to indicate this.
- Tutor then adds a student to the class (UC06).
Step 3 is repeated until all students have been added.
Use case ends.
Extensions
- 1a. TutorAid detects that the command keyed in is incorrect. (e.g. wrong format, missing arguments, invalid index)
- 1a1. TutorAid displays an error message and requests the tutor to re-enter the command.
- 1a2. Tutor re-enters the command, along with the necessary arguments.
Steps 1a1-1a2 are repeated until the command entered is correct.
Use case resumes from Step 2.
- 1b. Lesson appears to overlap with another class as intended by the Tutor.
- 1b1. TutorAid displays a warning message.
- 1b2. Tutor dismisses the warning message.
Use case resumes at Step 2.
- 1c. Class appears to overlap with another class due to a mistake of the Tutor.
- 1c1. TutorAid shows a warning message.
- 1c2. Tutor acknowledges the warning message and cancels the creation of the class.
Use case ends.
Use Case 8: Delete a lesson
MSS
- Tutor requests to list all lessons.
- TutorAid shows the list of all lessons.
- Tutor identifies the index of the lesson that is to be deleted in the list, and requests to delete the lesson at this index from TutorAid.
- TutorAid successfully deletes the lesson corresponding to the given index and displays a message to indicate this.
Use case ends.
Extensions
- 1a. TutorAid detects an error in the list command.
- 1a1. TutorAid displays an error message and requests the tutor to re-enter the command.
- 1a2. User re-enters the command.
Steps 1a1-1a2 are repeated until the command entered is correct.
Use case resumes from Step 2.
- 1b. The list is empty.
Use case ends.
- 3a. TutorAid detects that the command keyed in is incorrect. (e.g. wrong format, missing arguments, invalid index)
- 3a1. TutorAid displays an error message and requests the tutor to re-enter the command.
- 3a2. Tutor re-enters the command, along with the necessary arguments.
Steps 3a1-3a2 are repeated until the command entered is correct.
Use case resumes from Step 4.
Use case 9: View a lesson’s details
Pre-condition: The lesson (that contains the details) currently exists in TutorAid.
MSS
- Tutor requests a list of lessons.
- TutorAid shows the list of the lessons.
- Tutor identifies the index of a specific lesson in the list and requests to view the details of the lesson at this index.
- TutorAid displays all the details of the lesson corresponding to the index.
Use case ends.
Extensions
- 1a. TutorAid detects an error in the list command.
- 1a1. TutorAid displays an error message and requests the tutor to re-enter the command.
- 1a2. User re-enters the command.
Steps 1a1-1a2 are repeated until the command entered is correct.
Use case resumes from Step 2.
- 1b. The list is empty.
Use case ends.
- 3a. TutorAid detects that the command keyed in is incorrect. (e.g. wrong format, missing arguments, invalid index)
- 3a1. TutorAid displays an error message and requests the tutor to re-enter the command.
- 3a2. Tutor re-enters the command, along with the necessary arguments.
Steps 3a1-3a2 are repeated until the command entered is correct.
Use case resumes from Step 4.
Use Case 10: Edit the details of a lesson
Pre-condition: The lesson currently exists in TutorAid.
MSS
- Tutor requests a list of lessons.
- TutorAid shows the list of the lessons.
- Tutor identifies the index of a specific lesson in the list and requests to edit the details of the lesson at this index by providing the updated details.
- TutorAid updates the details and displays all the latest information of the lesson corresponding to the index, along with a message to indicate that it has done the update.
Extensions
- 1a. TutorAid detects an error in the list command.
- 1a1. TutorAid displays an error message and requests the tutor to re-enter the command.
- 1a2. User re-enters the command.
Steps 1a1-1a2 are repeated until the command entered is correct.
Use case resumes from Step 2.
- 1b. The list is empty.
Use case ends.
- 3a. TutorAid detects that the command keyed in is incorrect. (e.g. wrong format, missing arguments, invalid index)
- 3a1. TutorAid displays an error message and requests the tutor to re-enter the command.
- 3a2. Tutor re-enters the command, along with the necessary arguments.
Steps 3a1-3a2 are repeated until the command entered is correct.
Use case resumes from Step 4.
Use case 11: Add student(s) to lesson(s)
Pre-conditions: The students have been added to TutorAid and the lessons have been created.
MSS
- Tutor requests the list of students and lessons.
- TutorAid displays the list of all students and lessons.
- Tutor identifies the student indexes of the specific students and the lesson indexes of the specific lessons to which they wish to add these students to. The Tutor then requests to add these students to these lessons by providing these indexes.
- TutorAid adds the students to the lessons and displays a success message for each successful addition.
Use case ends.
Extensions
- 1a. TutorAid detects an error in the list command.
- 1a1. TutorAid displays an error message and requests the tutor to re-enter the command.
- 1a2. User re-enters the command.
Steps 1a1-1a2 are repeated until the command entered is correct.
Use case resumes from Step 2.
- 1b. The list is empty.
Use case ends.
- 3a. TutorAid detects that the command keyed in is incorrect. (e.g. wrong format, missing arguments, invalid indexes)
- 3a1. TutorAid displays an error message and requests the tutor to re-enter the command.
- 3a2. Tutor re-enters the command, along with the necessary arguments.
Steps 3a1-3a2 are repeated until the command entered is correct.
Use case resumes from Step 4.
- 4a. TutorAid detects that some specified student(s) already attend some specified lesson(s).
- 4a1. TutorAid still adds all the specified student(s) to all the specified lesson(s) while avoiding duplicate students in lessons.
- 4a2. TutorAid displays warning(s) that some specified student(s) already attend some specified lesson(s), while also displays a message for each successful addition of a student to a lesson.
Use case ends.
Use case 12: Remove student(s) from lesson(s)
Pre-conditions: The students have been added to TutorAid and the lessons have been created.
MSS
- Tutor requests the list of students and lessons.
- TutorAid displays the list of all students and lessons.
- Tutor identifies the student indexes of the specific students, and the lesson indexes of the specific lessons from which they wish to delete the students. The Tutor then requests to delete these students from these lessons by providing these indexes.
- TutorAid delete these students from these lessons and displays a success message for each successful deletion.
Use case ends.
Extensions
- 1a. TutorAid detects an error in the list command.
- 1a1. TutorAid displays an error message and requests the tutor to re-enter the command.
- 1a2. User re-enters the command.
Steps 1a1-1a2 are repeated until the command entered is correct.
Use case resumes from Step 2.
- 1b. The list is empty.
Use case ends.
- 3a. TutorAid detects that the command keyed in is incorrect. (e.g. wrong format, missing arguments, invalid indexes)
- 3a1. TutorAid displays an error message and requests the tutor to re-enter the command.
- 3a2. Tutor re-enters the command, along with the necessary arguments.
Steps 3a1-3a2 are repeated until the command entered is correct.
Use case resumes from Step 4.
- 4a. TutorAid detects that some specified student(s) are not attending some specified lesson(s).
- 4a1. TutorAid still deletes all the specified student(s) from all the specified lesson(s).
- 4a2. TutorAid displays warning(s) that some specified student(s) are not attending some specified lesson(s), while also displaying a message for each successful deletion of a student from a lesson.
Use case ends.
Use case 13: View which students should be present for the lesson
MSS
- Tutor requests to view the specific lesson (UC09).
- TutorAid displays the details of that specific lesson, including the list of students enrolled in that lesson.
Use case ends.
Use cases that are to be added to TutorAid in the future
Use case 14: Edit a student’s progress
MSS
- Tutor requests to view the details of a specific student(UC03).
- TutorAid displays the details of that specific student, including all the past progress notes added for that student.
- Tutor identifies the index of a specific note in that list, and requests to edit this progress note for this student by passing in the index of the student, index of the note and the updated details to be included in the note.
- TutorAid updates the progress note from the student corresponding to the given index and displays a message to indicate that it has done it.
Use case ends.
Extensions
- 3a. TutorAid detects that the command keyed in is incorrect. (e.g. wrong format, missing arguments, invalid indices)
- 3a1. TutorAid displays an error message and requests the tutor to re-enter the command.
- 3a2. Tutor re-enters the command, along with the necessary arguments.
Steps 3a1-3a2 are repeated until the command entered is correct.
Use case resumes from Step 4.
Use case 15: Update payment status for a student
Pre-condition: There is at least one student added to TutorAid.
MSS
- Tutor requests to view the list of their students.
- TutorAid shows the list of all students.
- Tutor identifies the index of the specific student for which the payment is to be updated to ‘paid’ or ‘unpaid’ and requests to update the payment status for this student accordingly.
- TutorAid successfully updates the payment status for the student corresponding to the given index number and displays a message to indicate this.
Use case ends.
Extensions
- 1a. TutorAid detects an error in the list command.
- 1a1. TutorAid displays an error message and requests the tutor to re-enter the command.
- 1a2. User re-enters the command.
Steps 1a1-1a2 are repeated until the command entered is correct.
Use case resumes from Step 2.
- 1b. The list is empty.
Use case ends.
- 3a. TutorAid detects that the command keyed in is incorrect. (e.g. wrong format, missing arguments, invalid indices)
- 3a1. TutorAid displays an error message and requests the tutor to re-enter the command.
- 3a2. Tutor re-enters the command, along with the necessary arguments.
Steps 3a1-3a2 are repeated until the command entered is correct.
Use case resumes from step 4.
Use case 16: Add multiple students to multiple lessons
Pre-conditions: The students have been added to TutorAid and the lessons have been created.
MSS
- Tutor requests the list of students and lessons.
- TutorAid displays the list of all students and lessons.
- Tutor identifies the indices of the students, and the lessons to which they wish to add the students to. The Tutor then requests to add all the specified students to the specified lessons by providing the respective indices.
- TutorAid adds all the students to all the lessons and displays a message to indicate that it has been done.
Use case ends.
Extensions
- 1a. TutorAid detects an error in the list command.
- 1a1. TutorAid displays an error message and requests the tutor to re-enter the command.
- 1a2. User re-enters the command.
Steps 1a1-1a2 are repeated until the command entered is correct.
Use case resumes from step 2.
- 3a. TutorAid detects that the command keyed in is incorrect. (e.g. wrong format, missing arguments, invalid indices)
- 3a1. TutorAid displays an error message and requests the tutor to re-enter the command.
- 3a2. Tutor re-enters the command, along with the necessary arguments.
Steps 3a1-3a2 are repeated until the command entered is correct.
Use case resumes from step 4.
- 3b. TutorAid detects that at least one of the given students have already been added to the at least one of the given lessons.
- 3b1. TutorAid displays an alert about these students but continues to add the remaining students into the remaining lessons.
Use case ends.
Use case 17: Remove multiple students from multiple lessons
Pre-conditions: The students have been added to TutorAid and the lessons have been created.
MSS
- Tutor requests the list of students and lessons.
- TutorAid displays the list of all students and lessons.
- Tutor identifies the indices of the students, and the lessons from which they wish to remove the students. The Tutor then requests to remove all the specified students to the specified lessons by providing the respective indices.
- TutorAid removes all the students from all the lessons and displays a message to indicate that it has been done.
Use case ends.
Extensions
- 1a. TutorAid detects an error in the list command.
- 1a1. TutorAid displays an error message and requests the tutor to re-enter the command.
- 1a2. User re-enters the command.
Steps 1a1-1a2 are repeated until the command entered is correct.
Use case resumes from step 2.
- 3a. TutorAid detects that the command keyed in is incorrect. (e.g. wrong format, missing arguments, invalid indices)
- 3a1. TutorAid displays an error message and requests the tutor to re-enter the command.
- 3a2. Tutor re-enters the command, along with the necessary arguments.
Steps 3a1-3a2 are repeated until the command entered is correct.
Use case resumes from step 4.
- 3b. TutorAid detects that at least one of the given students are not currently enrolled in at least one of the given lessons.
- 3b1. TutorAid displays an alert about these students but continues to remove the remaining students from the remaining lessons.
Use case ends.
Use Case 18: View schedule for the upcoming week
MSS
- Tutor enters the end date of the upcoming week, and requests to view the schedule up till that date.
- TutorAid shows the lessons and milestones in the upcoming week in a chronological order.
- Tutor requests to view the happenings for a specific date in the week.
- TutorAid shows the details of the lessons and milestones for that specific date in a chronological order.
Use case ends.
Steps 3-4 are repeated until Tutor wishes to stop viewing the details of lesson and milestones for a specific date in the upcoming week.
Use case ends.
Extensions
- 1a. The given date has an invalid format.
- 1a1. TutorAid shows an error message.
- 1a2. Tutor re-enters the date.
Steps 1a1 - 1a2 are repeated until a valid format for the date is given.
Use case resumes from step 2.
- 1b. TutorAid detects an error in the command to view schedule. (e.g. wrong format, missing arguments, invalid indices)
- 1b1. TutorAid displays an error message and requests the tutor to re-enter the command.
- 1a2. User re-enters the command, along with the necessary arguments.
Steps 1b1-1b2 are repeated until the command entered is correct.
Use case resumes from Step 2.
- 3a. The given date has an invalid format.
- 3a1. TutorAid shows an error message.
- 3a2. Tutor re-enters the date.
Steps 3a1 - 3a2 are repeated until a valid format for the date is given.
Use case resumes from step 4.
Use case 19: Add a to-do list for a lesson
Pre-condition: The lesson has been added to TutorAid prior to this.
MSS
- Tutor requests to view their schedule.
- TutorAid displays the schedule.
- Tutor identifies the lesson to add a to-do list for and requests to add a to-do list for that lesson.
- TutorAid creates a to-do list for that lesson.
- Tutor enters a task to be added to the to-do list.
- TutorAid adds the task to the to-do list.
Steps 5-6 are repeated until the Tutor finishes adding all the tasks.
Use case ends.
Extensions
- 1a. TutorAid detects an error in the command to view schedule. (e.g. wrong format, missing arguments, invalid indices)
- 1a1. TutorAid displays an error message and requests the tutor to re-enter the command.
- 1a2. User re-enters the command, along with the necessary arguments.
Steps 1a1-1a2 are repeated until the command entered is correct.
Use case resumes from step 2.
- 3a. TutorAid detects an error in the command to add a to-do list. (e.g. wrong format, missing arguments, invalid indices)
- 3a1. TutorAid displays an error message and requests the tutor to re-enter the command.
- 3a2. User re-enters the command, along with the necessary arguments.
Steps 3a1-3a2 are repeated until the command entered is correct.
Use case resumes from step 4.
- 5a. TutorAid detects an error in the command to add a task to the to-do list. (e.g. wrong format, missing arguments, invalid indices)
- 5a1. TutorAid displays an error message and requests the tutor to re-enter the command.
- 5a2. User re-enters the command, along with the necessary arguments.
Steps 5a1-5a2 are repeated until the command entered is correct.
Use case resumes from step 6.
Use case 20: Reset payment status for all students at the end of the month
Preconditions: There is at least one student in TutorAid who has the payment status ‘paid’.
MSS
- Tutor requests to show the list of their students.
- TutorAid displays the list of all students.
- Tutor identifies that all students have made payment for the month and requests to reset their payment statuses to ‘unpaid’ by entering in their indices.
- TutorAid successfully resets payment for all students, and displays a message to indicate this.
Use case ends.
Extensions
- 1a. TutorAid detects an error in the list command.
- 1a1. TutorAid displays an error message and requests the tutor to re-enter the command.
- 1a2. Tutor re-enters the command.
Steps 1a1-1a2 are repeated until the command entered is correct.
Use case resumes from step 2.
- 3a. TutorAid detects that the command keyed in is incorrect. (e.g. wrong format, missing arguments, invalid indices)
- 3a1. TutorAid displays an error message and requests the tutor to re-enter the command.
- 3a2. Tutor re-enters the command, along with the necessary arguments.
Steps 3a1-3a2 are repeated until the command entered is correct.
Use case resumes from step 4.
- 3b. TutorAid detects that at least one of the given students do not have the current payment status as ‘paid’.
- 3b1. TutorAid displays an alert about these students but continues to resetting the status for the remaining students.
Use case ends.
Non-Functional Requirements
- The system should be able to run on any machine that has Java 11 or higher installed.
- The user should be able to access the list of available commands within 2 inputs/clicks.
- The length of the user commands should not be more than 20 characters (excluding the arguments).
- No user input should corrupt the data file. (The data file should still be able to be parsed by TutorAid at all times)
- The system should respond within 5 seconds for any action.
- The system should not crash even when hundreds of student data are stored.
- The system should only be able to handle up to 1000 students.
- The user input elements are still visible even with hundreds of data records being displayed.
- The project is expected to adhere to a schedule that delivers updates every 2 weeks.
- The product should be fully functional offline and should not rely on internet connection to carry out any of its functions.
- The product is not required to handle mobile phone capabilities.
- The product is not required to handle any other languages (other than English).
- The product is not required to facilitate monetary transactions for payment of tuition fees.
- The product data should be transferable from one computer to another.
Glossary
- Lesson: Contains all the details of a particular tutoring session, such as the name and time of the session (e.g. Physics, Wednesday 3-4pm)
- Milestone: An upcoming/important assessment students
- To-do list: List of tasks to be done before and during a lesson
- Schedule: A calendar view of all lessons and milestones
Appendix: Instructions for manual testing
Given below are instructions to test the app manually.
Launch and shutdown of TutorAid
-
Initial launch
-
Download the jar file and copy into an empty folder
-
Double-click the jar file Expected: Shows the GUI with a set of sample data. The window size may not be optimum.
-
-
Saving window preferences
-
Resize the window to an optimum size. Move the window to a different location. Close the window.
-
Re-launch the app by double-clicking the jar file.
Expected: The most recent window size and location is retained.
-
Deleting a student from TutorAid
-
Deleting a student while all students are being shown
-
Prerequisites: List all student using the
listcommand and there are multiple students in the list. -
Test case:
del -s 1Expected: First student is deleted from the list. Details of the deleted student contact shown in the status message. Timestamp in the status bar is updated.
-
Test case:
del -s 0Expected: No student is deleted. Error details shown in the status message. Status bar remains the same.
-
Other incorrect delete commands to try:
del,del -s x,...(where x is larger than the list size)Expected: Similar to previous.
-
Saving data
-
Dealing with corrupted/missing data files
-
Prerequisites: The file
[JAR file location]/data/tutorAidLessons.jsonexists. -
Test case: Adding a duplicate lesson directly into
tutoraidLessons.jsonAdd the following code snipped into
tutoraidLessons.json:{ "lessonName" : "Maths 1", "capacity" : "", "price" : "", "students" : [], "timing" : "" }Now save the file and try to launch TutorAid.
Expected: TutorAid will open but none of the sample data in
tutoraidLessons.jsonwill be displayed. Status bar remains the same. -
Test case: Delete
tutoraidLessons.jsonNow launch TutorAid.
Expected: TutorAid will open and there will be no lessons displayed. Status bar remains the same.
-