User Guide
Table of Contents
1. Introduction
Welcome to the TutorAid User Guide, the one-stop manual where you will find everything that you need to know about how to use the application!
TutorAid is a desktop app for private tutors to keep track of the details of their students and lessons.
Some main ways in which TutorAid can help you with your tutoring responsibilities include:
- Storing of your students’ and their parents’ contact details
- Storing and managing of your lesson details
- Tracking of your students’ progress
TutorAid is also a unique app that is optimised for use via a Command Line Interface (CLI) while retaining the benefits of a visually-appealing Graphical User Interface (GUI). If you can type fast, TutorAid can help you to manage your tutoring tasks more efficiently than traditional GUI apps!
We hope that TutorAid will be helpful in adding more organisation to your tutoring career ![]()
Just downloaded TutorAid? Check out the About and Quick Start sections to see how you can get started!
2. About
This section contains information and terms that may help you to understand the user guide.
2.1 User Guide Formatting
Formats discussed in this section may be used in relevant areas of this user guide.
Tips
Tips are helpful suggestions that may improve your experience using TutorAid.
This is helpful.
Warnings
Warnings can inform you of things that should be followed carefully to prevent any undesirable behaviour of TutorAid.
This is important!
Commands
Commands in these highlighted boxes are typically used to show exactly what you should enter into TutorAid (including spaces).
command
2.2 TutorAid Visual Components
This section details the various components in TutorAid and how they will be referred to throughout the guide.
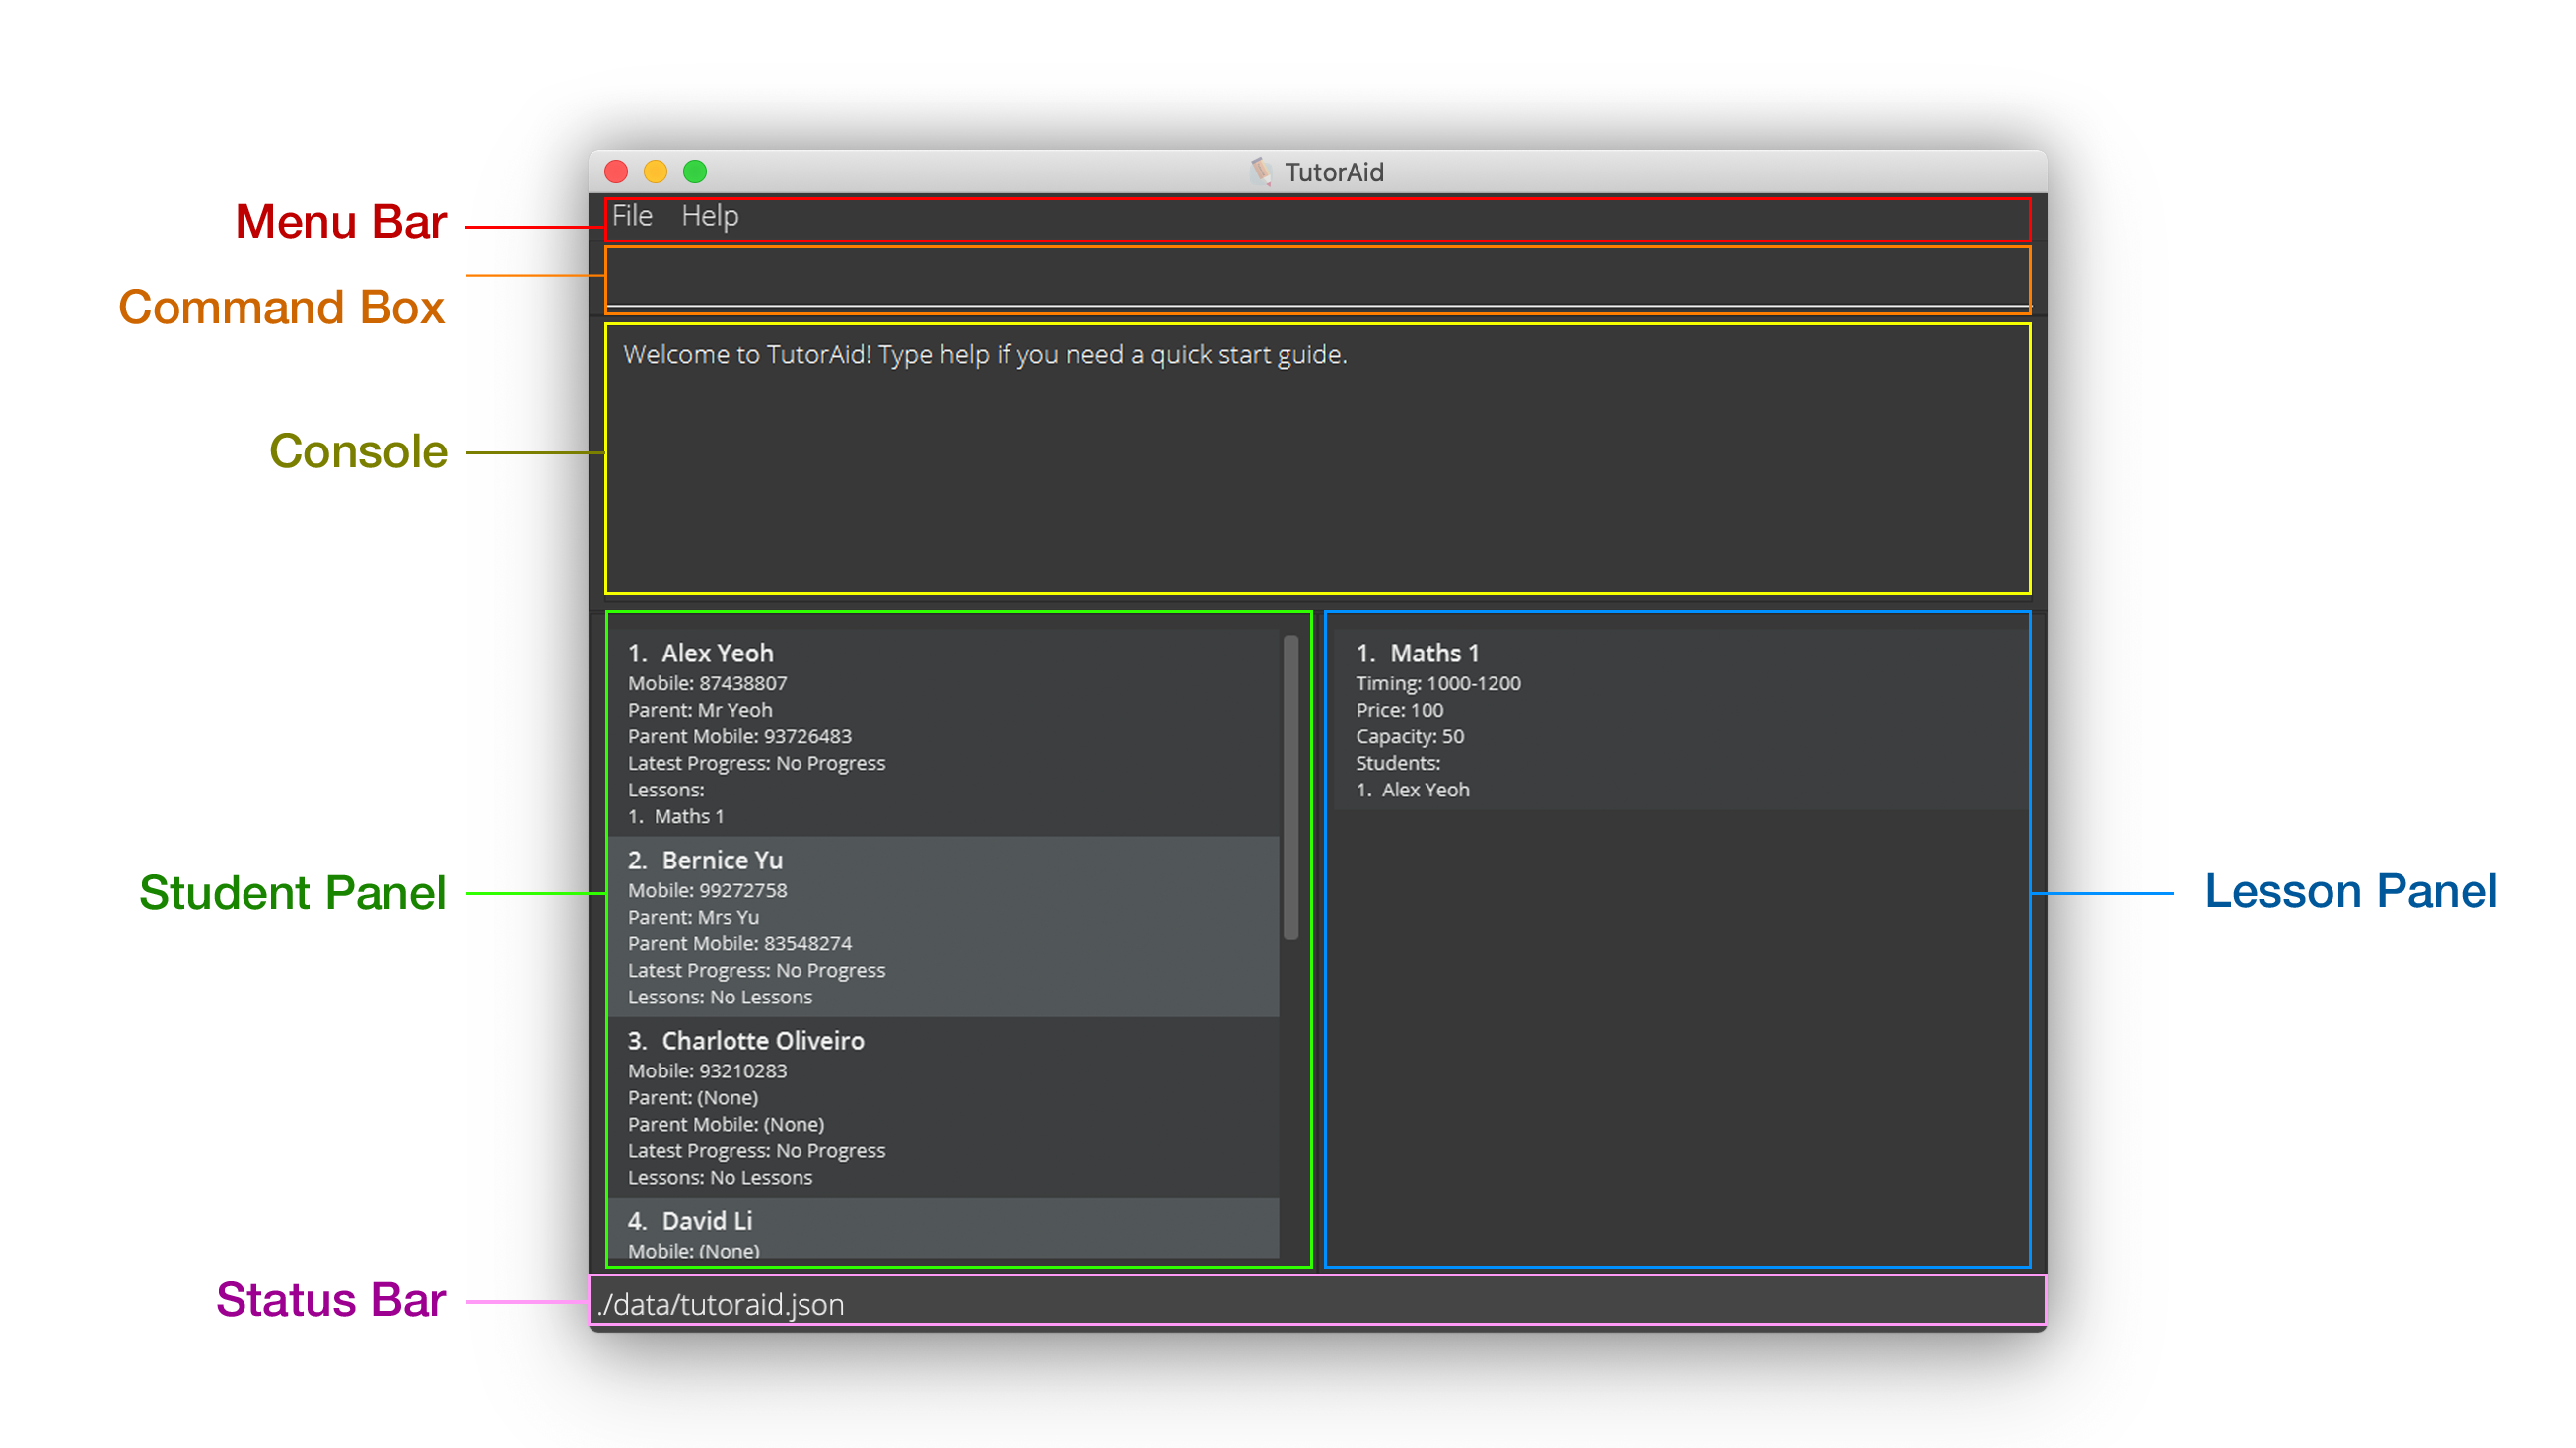
Menu Bar
This is an area where some features, such as the offline help guide, can be found. However, as you will primarily interact with TutorAid through the command box, this area is infrequently used.
Console
The Console is used by TutorAid to communicate with you. Whenever a command is carried out, TutorAid will display a message here to let you know whether its execution was successful. This message usually provides you with details about the changes made during the execution of the command.
Command Box
The Command Box is a field in which you can type instructions (also referred to as commands) to TutorAid. Commands in this user guide should typically be copied into this Command Box exactly as they are. After you have typed a command into this box, you can press ENTER on your keyboard to let TutorAid execute your command.
If your command is of the wrong format, TutorAid will try to show you the correct format in the Console if it is able to infer the command that you had intended to key in.
Student Panel
The Student Panel is where your students are listed. There are two modes for this panel: Full and Minimal.
-
Full mode: All the details about each student is displayed in full in the panel.
-
Minimal mode: Only the names and index numbers of the students are shown in the panel.
These modes can be set via the list command. In the labelled screenshot above, the Student Panel is in the Full mode.
Lesson Panel
The Lesson Panel is where your lessons are listed. Just like the Student Panel, you can choose between the Full and Minimal modes to determine how much information is displayed. In the labelled screenshot, the Lesson Panel is in Full mode.
Status Bar
The Status Bar shows the path where you can find the saved file for TutorAid.
2.3 Command Format
Commands are text that you can enter into the Command Box to tell TutorAid to perform an operation. Some commands can be divided into a few components, each of which serve different a purpose. The following diagram depicts the components of a command:

In this section, we will be using this as an example to study and understand the various components of a command in TutorAid.
Command Word
The Command Word is how you can tell TutorAid what kind of operation you want to do. These command words can also be found here. All commands must contain a Command Word.
In the example above, edit tells TutorAid to perform an edit operation.
Command Flag
The Command flag is used to differentiate between commands with the same command word. For example, the edit command word can be used to edit the details of a student or a lesson. To differentiate between these usages, you need to additionally pass in a Command Flag to TutorAid.
In most commands, the -s and -l command flags are used to denote operations that are to be performed on students and lessons respectively.
In the example above, the command flag -s tells TutorAid to perform the edit operation on students.
Index Number
Some commands perform operations on a specific student or lesson. In such cases, you would need provide TutorAid with the index number of that specific student or a lesson. The index number can be found by looking at the left margins of the respective panels - the Student Panel or the Lesson Panel.
In the example above, 3 tells TutorAid to perform the edit operation on the 3rd student in the Student Panel.
Parameter
Parameter typically refers to additional details that you need to provide in order to successfully execute a command. There can be multiple parameters for a single command, depending on the type of command that you wish to perform. A Parameter can be further divided into 2 components:
-
Prefix: Prefix refers to the starting few characters of a parameter (up till and including the
/). These prefixes act as labels for you and TutorAid to differentiate between various details that you may need to add in a command.
In the example above,sn/andsp/help to distinguish between the student’s name and the student’s phone number respectively. -
Argument: Argument refers to the sequence of characters that follow immediately after the
/and before the start of the next prefix (if any). They are the information that you pass into a command and act as values for prefixes.
In the example above,Matthew Judgeis the value for the prefix student name.
Putting together both the prefix and the argument, sn/Matthew Judge informs TutorAid that the name of the 3rd student in the Student Panel should be updated to Matthew Judge. Similarly, sp/91263740 tells TutorAid that the phone number of the 3rd student in the Student Panel should be updated to 91263740.
2.3.1 Command Syntax in this Guide
In this guide, the syntax/format of a command is shown as such:
edit -s INDEX_NUMBER [sn/STUDENT_NAME] [sp/STUDENT_PHONE] [pn/PARENT_NAME] [pp/PARENT_PHONE]

add -sl s/STUDENT_INDEX... n/LESSON_INDEX...
- Words in
UPPER_CASEare the parameters that you need to supply. - Parameters in square brackets are optional for you to provide.
- Parameters can be in any order.
e.g.
add -sl s/STUDENT_INDEX... n/LESSON_INDEX...is the same asadd -sl n/LESSON_INDEX... s/STUDENT_INDEX... - If a parameter is expected only once in the command but you specify it multiple times, only the last occurrence of the parameter will be taken.
-
...signals that multiple arguments can be supplied to this parameter, with each argument being separated by a space (s/STUDENT_INDEX...then boths/1 2 3ands/1are acceptable inputs, but nots/. - If you include extraneous parameters for commands that do not take in parameters, TutorAid will simply ignore the parameters.
e.g. If you key in
help 123, TutorAid will interpret it as justhelpas this command does not take in any parameters.
3. Quick Start
-
Ensure that you have Java
11or above installed in your computer. -
Download the latest
tutoraid.jarfrom here. -
Copy this file into the folder that you want to use as the home folder for TutorAid.
-
You can then launch TutorAid on your computer in 2 different ways:
-
Launch by doing a double-click:
- Double-click the
tutoraid.jarfile to start the application. An application window similar to the one shown below should appear in a few seconds.
- Double-click the
-
Launch using Terminal:
-
Find the Terminal application in your computer and open it.
-
In the terminal, first navigate to the home folder that contains
tutoraid.jar. For example, if you had addedtutoraid.jarto a folder labeled TutorAid in your Desktop folder, you can use the commandcd Desktop/TutorAidto navigate to the folder. After navigating, you can key in thelscommand into the terminal. If you are in the right folder, thetutoraid.jarfile will appear in the list. -
Lastly, key in the following command to launch
tutoraid.jar:java -jar tutoraid.jar. An application window similar to the one below should appear in a few seconds. If you are using the second approach, it is recommended to store tutoraid.jarin a folder in your Desktop so that it is easier to navigate to it the next time you need to launch TutorAid! Notice how the application contains some sample data.
-
-
If this is your first time using TutorAid, we highly encourage you to check out our Beginner’s Tutorial so that you can practise using a few of the commands and familiarise yourself with the application!
-
After completing the tutorial, you may refer to the Features section below to see all the commands available in TutorAid.
4. Beginner’s Tutorial
Welcome to TutorAid’s beginner’s tutorial! Here, you will learn how you can use a few of our commands to manage the details of your students and lessons on a day-to-day basis ![]()
If this is your first time launching TutorAid, you will be able to see that some sample data has been provided to you.
Tips before you get started
-
As you follow the tutorial, we also encourage you to further experiment with the various commands on your own to understand the ways in which TutorAid can help you!
-
As you try out the different commands during the tutorial, the manner in which TutorAid displays information to you may change (e.g. At times, only the details of specific students and lessons will be shown). In such cases, you can key in the
list -ainto the Command Box and press ENTER to return back to the view that you are currently starting out with. For more information on changing the viewing modes in TutorAid, you can refer to the detailed documentation for ‘List’ commands.
4.1: Adding a student and editing his/her details
Imagine that a new student, John Yeo, has just approached you for your tutoring services. He has also provided you with the following contact details for your own reference:
- John’s phone number: 98765432
- John’s parent’s name: Mary Yeo
- John’s parent’s phone number: 81234567
You can then easily add his data to TutorAid by following the steps below:
-
Key in
add -s sn/John Yeo sp/98765432 pn/Mary Yeo pp/81234567into the Command Box and press ENTER. You can also add John into TutorAid by keying in add -s sn/John Yeointo the Command Box. This is because all details other than the student’s name are optional for you to note down. For more information, you can refer to the detailed documentation of the Add a Student command. -
Upon pressing ENTER, notice how the Student Panel will be updated accordingly with John’s details, as show below:
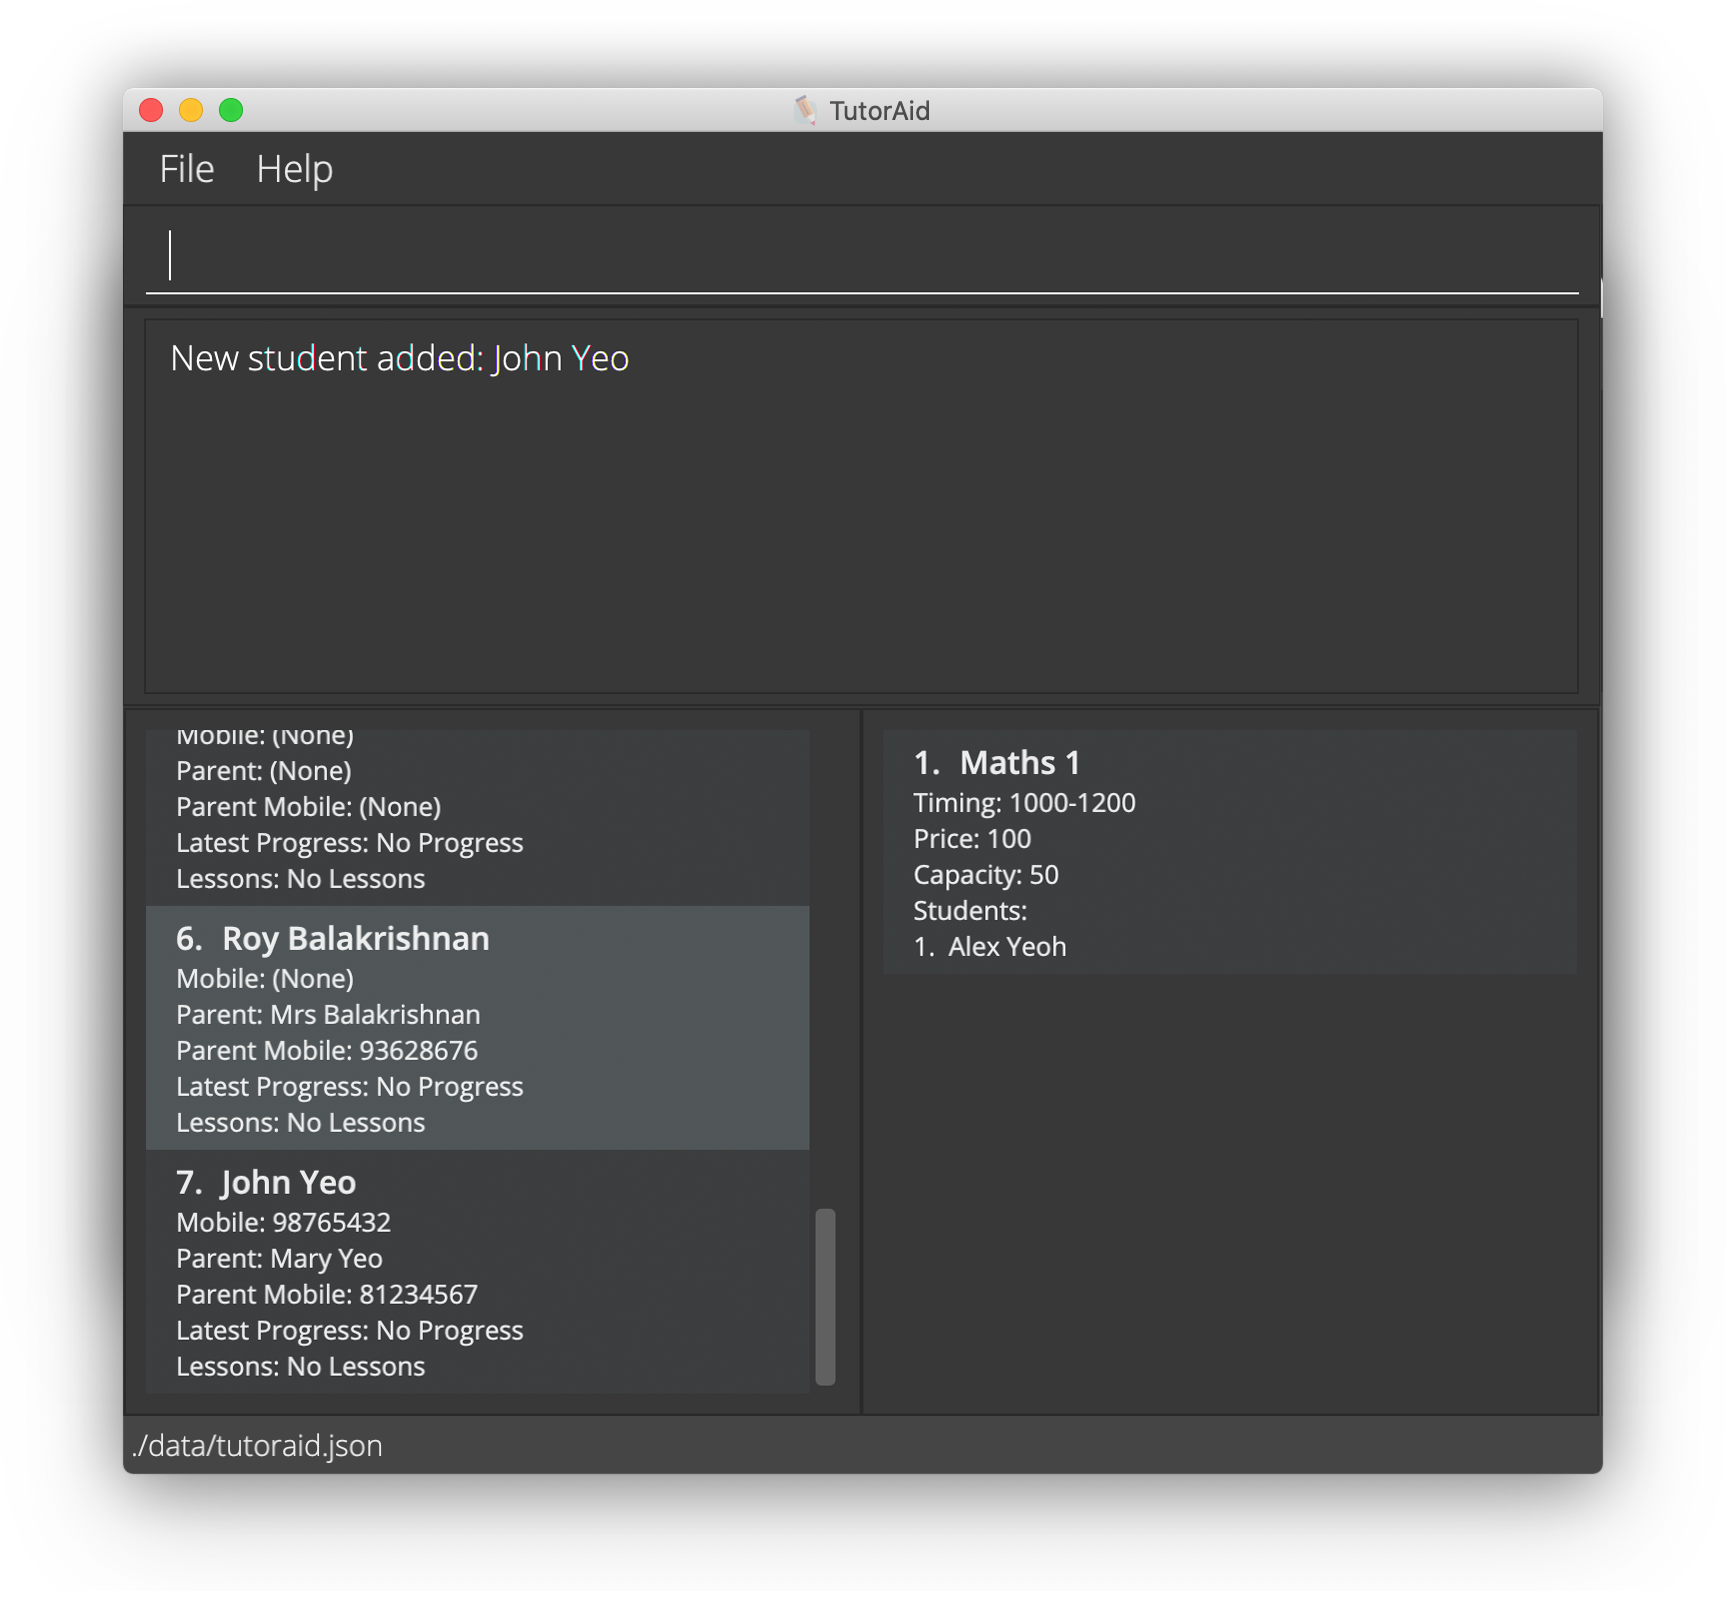
If you do not see John’s details on your screen, you can scroll down the Student Panel to find his details.
Now, let us assume that John has just informed you that he has changed his phone number to 84632975. You can update his contact details in TutorAid by completing the steps below:
-
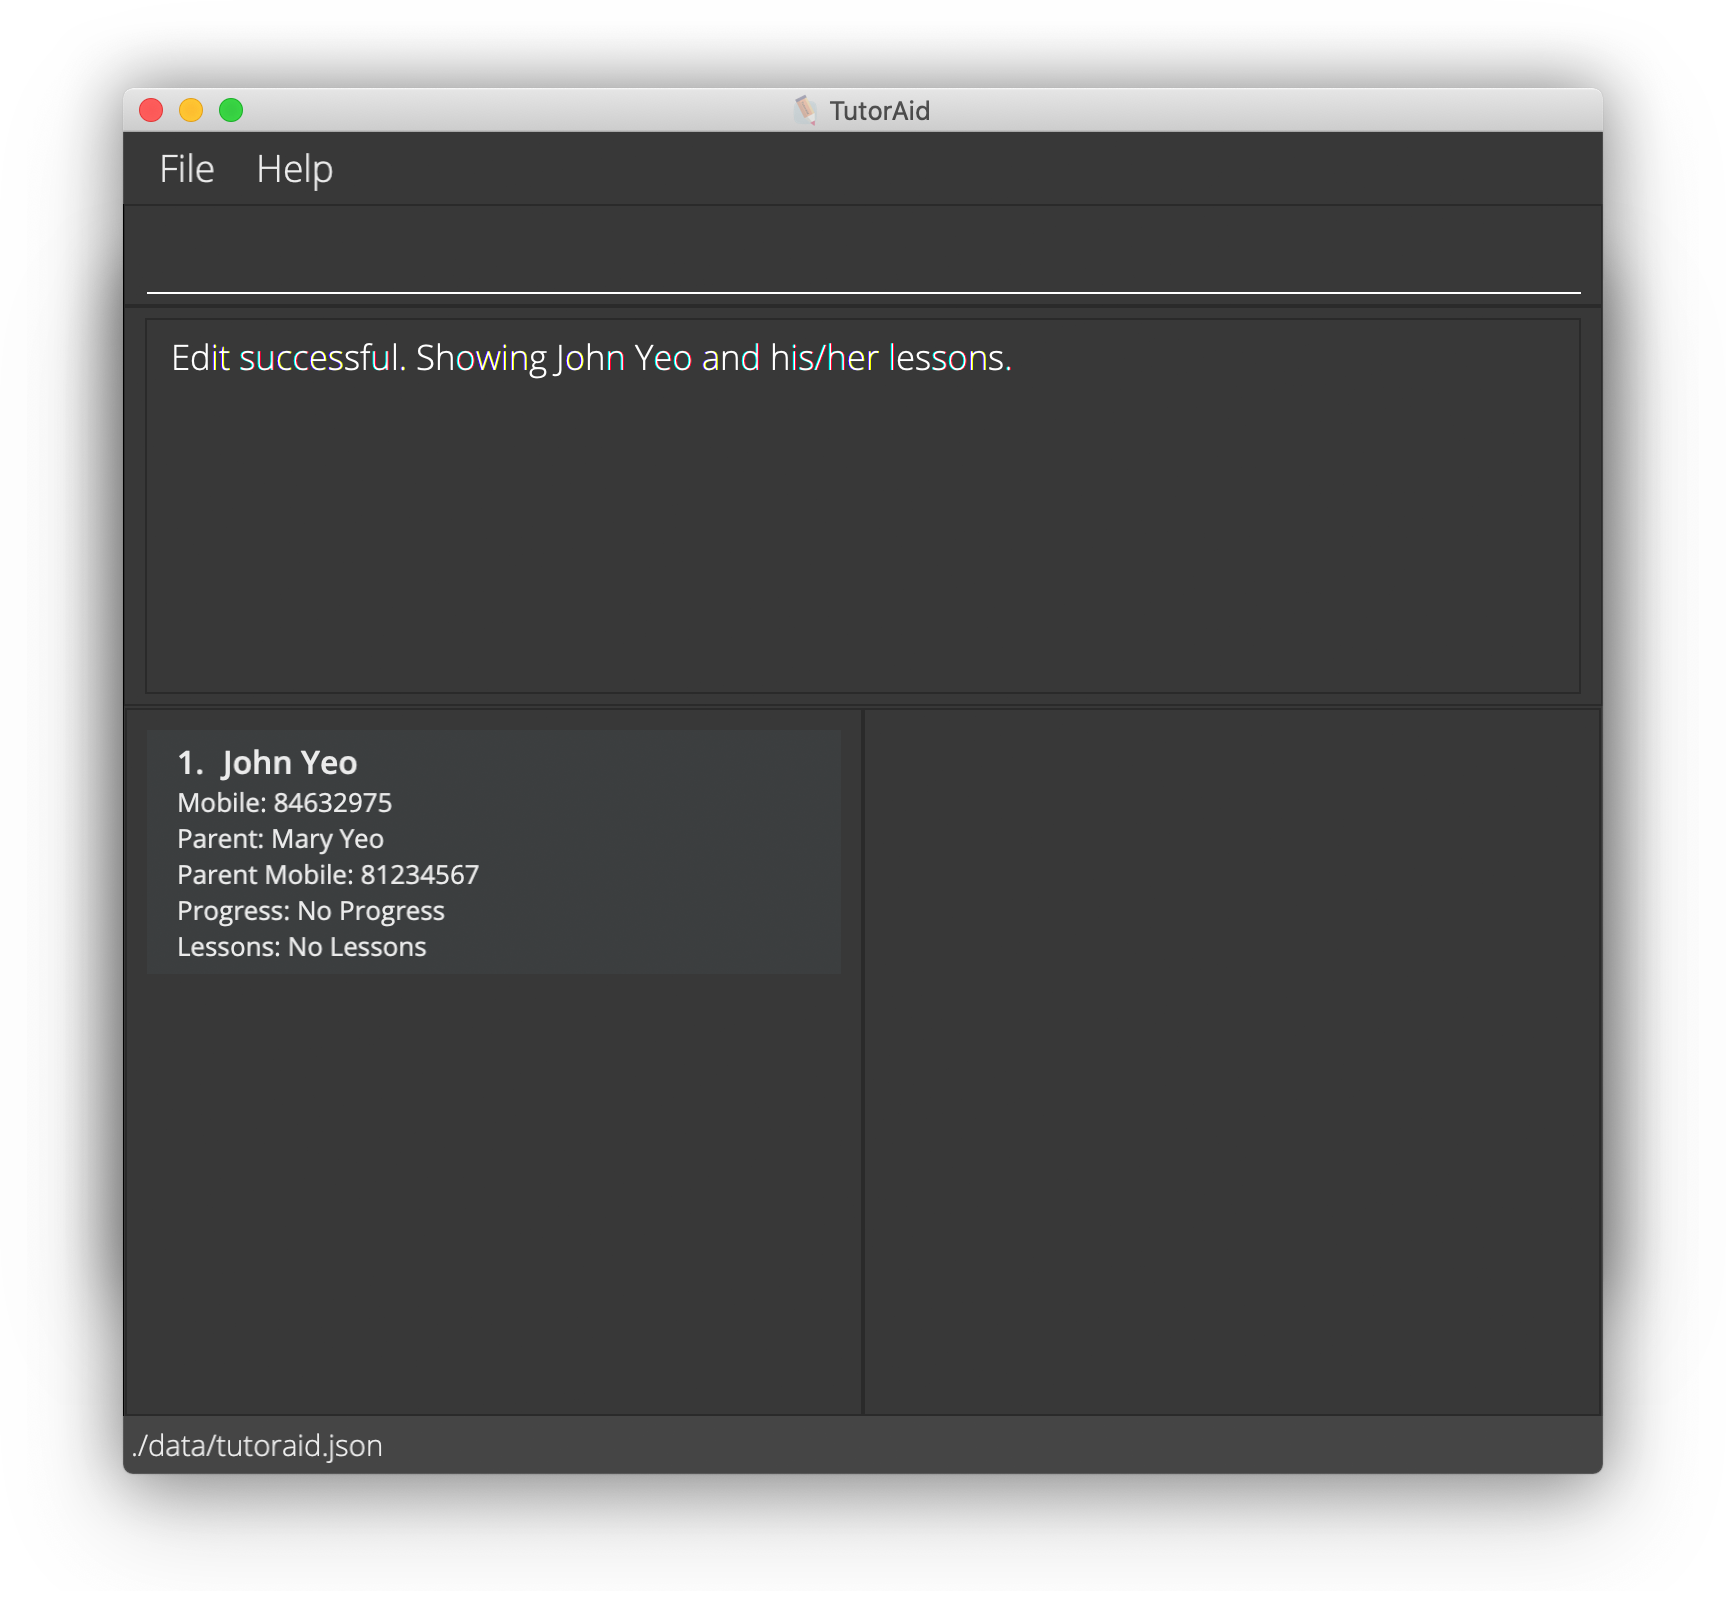
Type
edit -s 7 sp/84632975and press ENTER. The 7in the command above refers to the index number of John Yeo in the Student Panel. For more information, you can refer to the detailed documentation for editing a student’s details. -
You will now be able to see that John Yeo’s phone number has been successfully changed to 84632975, as seen here:
You can then key in the
list -ainto the Command Box and press ENTER to change back to your original view.
4.2: Adding a lesson and editing its details
Now that you have added your first student, it is time to add a lesson to TutorAid. Let us add a lesson named ‘History 1’ into TutorAid, along with the following details:
- Lesson timing: 10AM - 11AM on Mondays
- Lesson capacity: 10 students
You can quickly add this information into TutorAid by completing the steps below:
-
Type
add -l n/History 1 c/10 t/10AM - 11AM on Mondaysinto the Command Box and press ENTER. -
Observe how all the details of History 1 is reflected in the Lesson Panel:
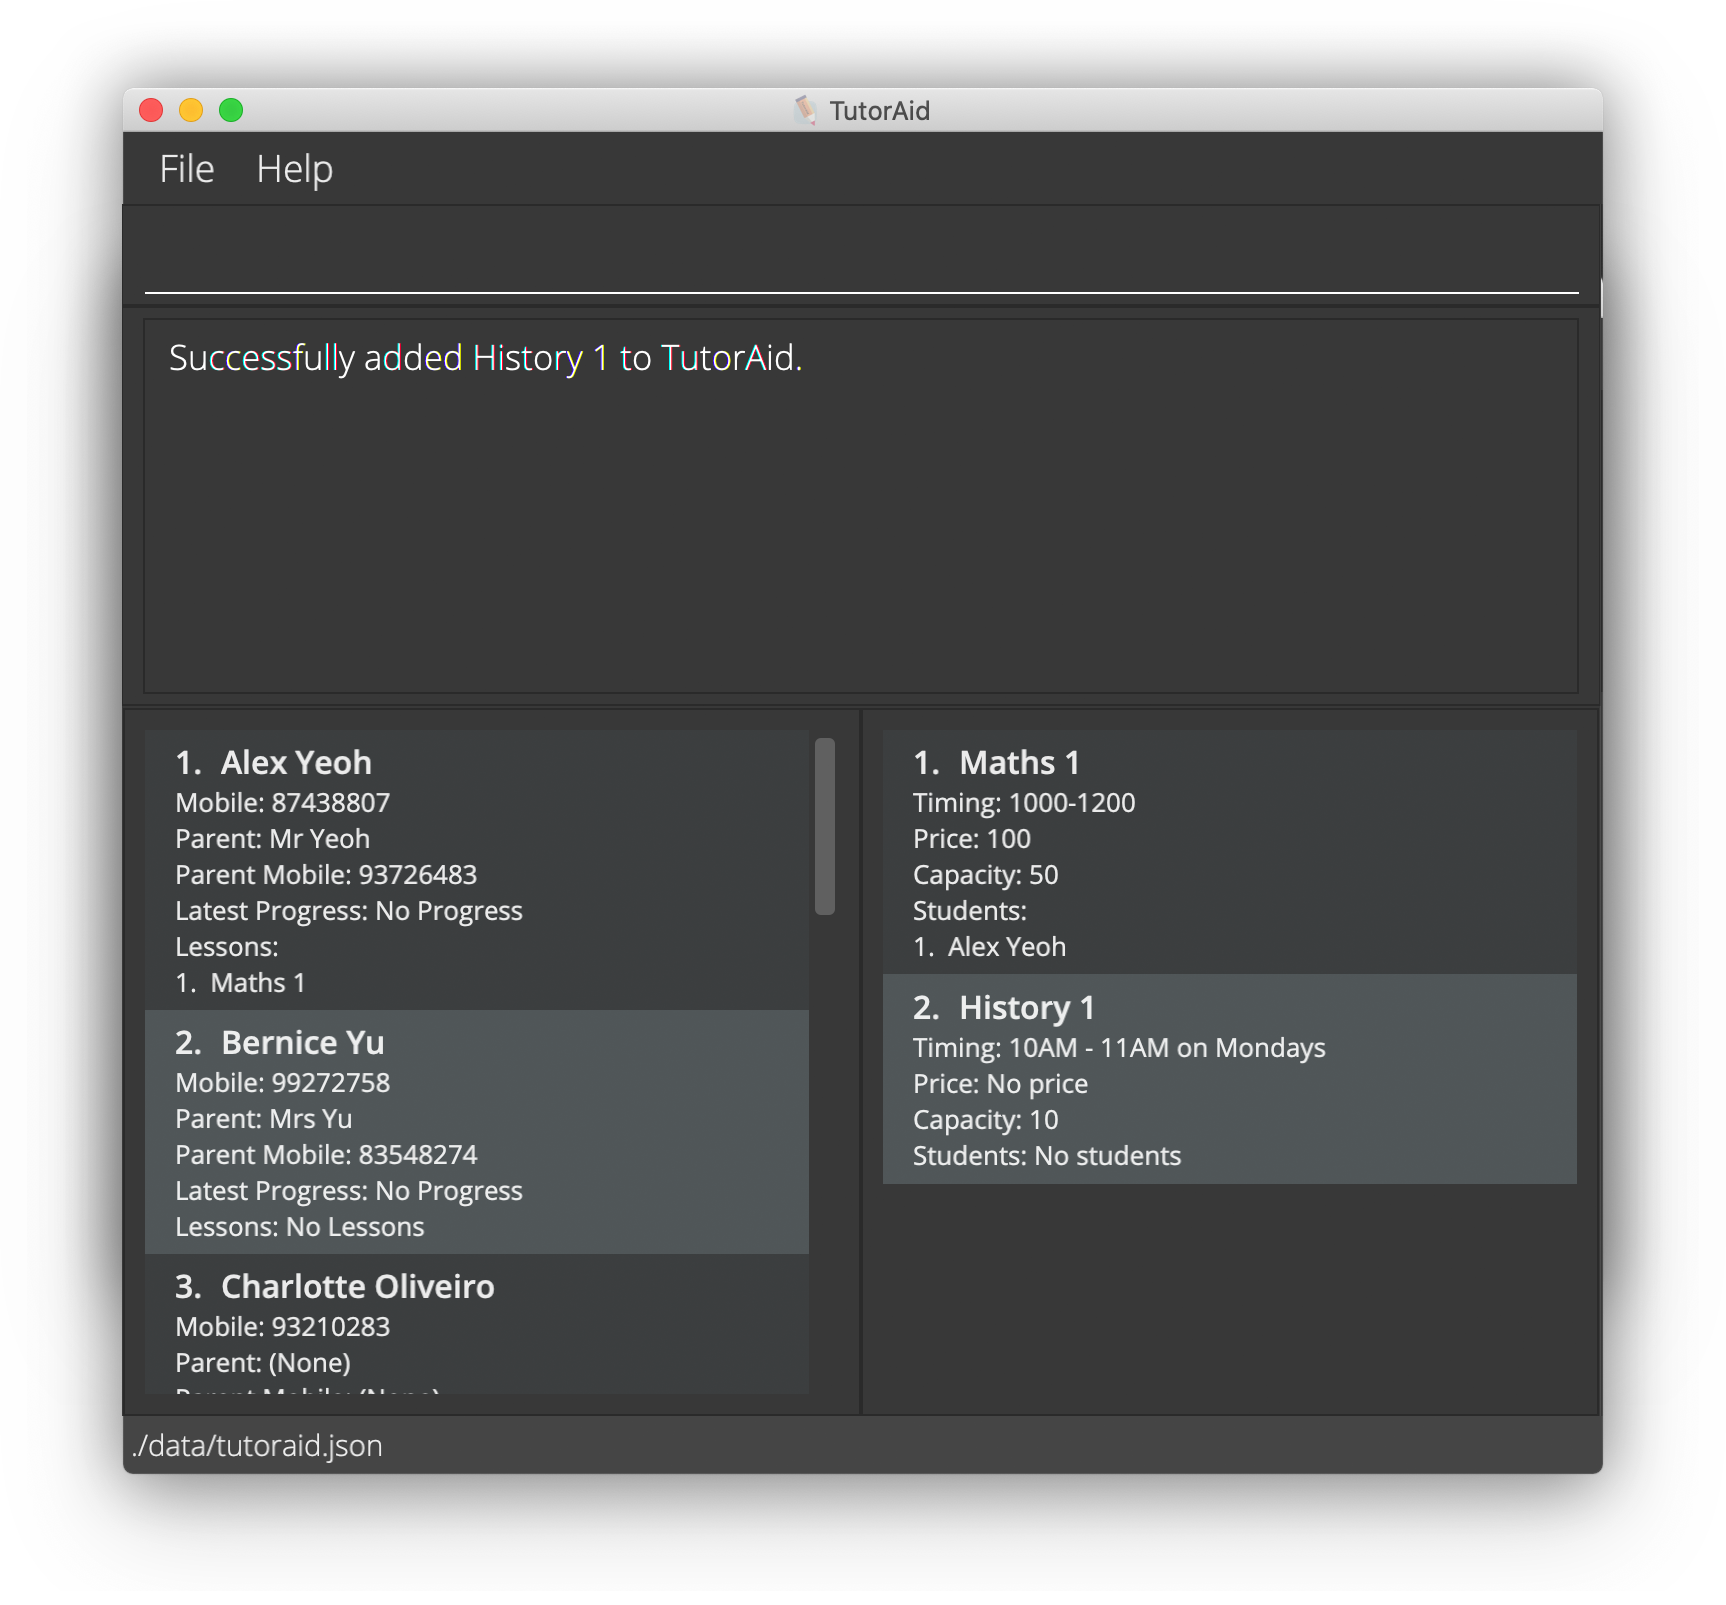 All details other than the lesson name are optional for you to key in as well. You can check out the detailed documentation of the ‘Add a Lesson’ command for more information.
Next, let us assume that you have decided to charge your students $125.90 per month for the lesson History 1. You can add this detail into TutorAid by doing the following steps:
-
Type the command
edit -l 2 p/125.90and press ENTER. The 2in the command above refers to the index number of History 1 in the Lesson Panel. For more information, you can refer to the detailed documentation for editing a lesson’s details. -
You will now be able to see how the lesson pricing has been updated to ‘125.90’, as seen below:

You can now key in the
list -ainto the Command Box and hit ENTER if you wish to return back to your original view.
4.3: Adding a student to a lesson
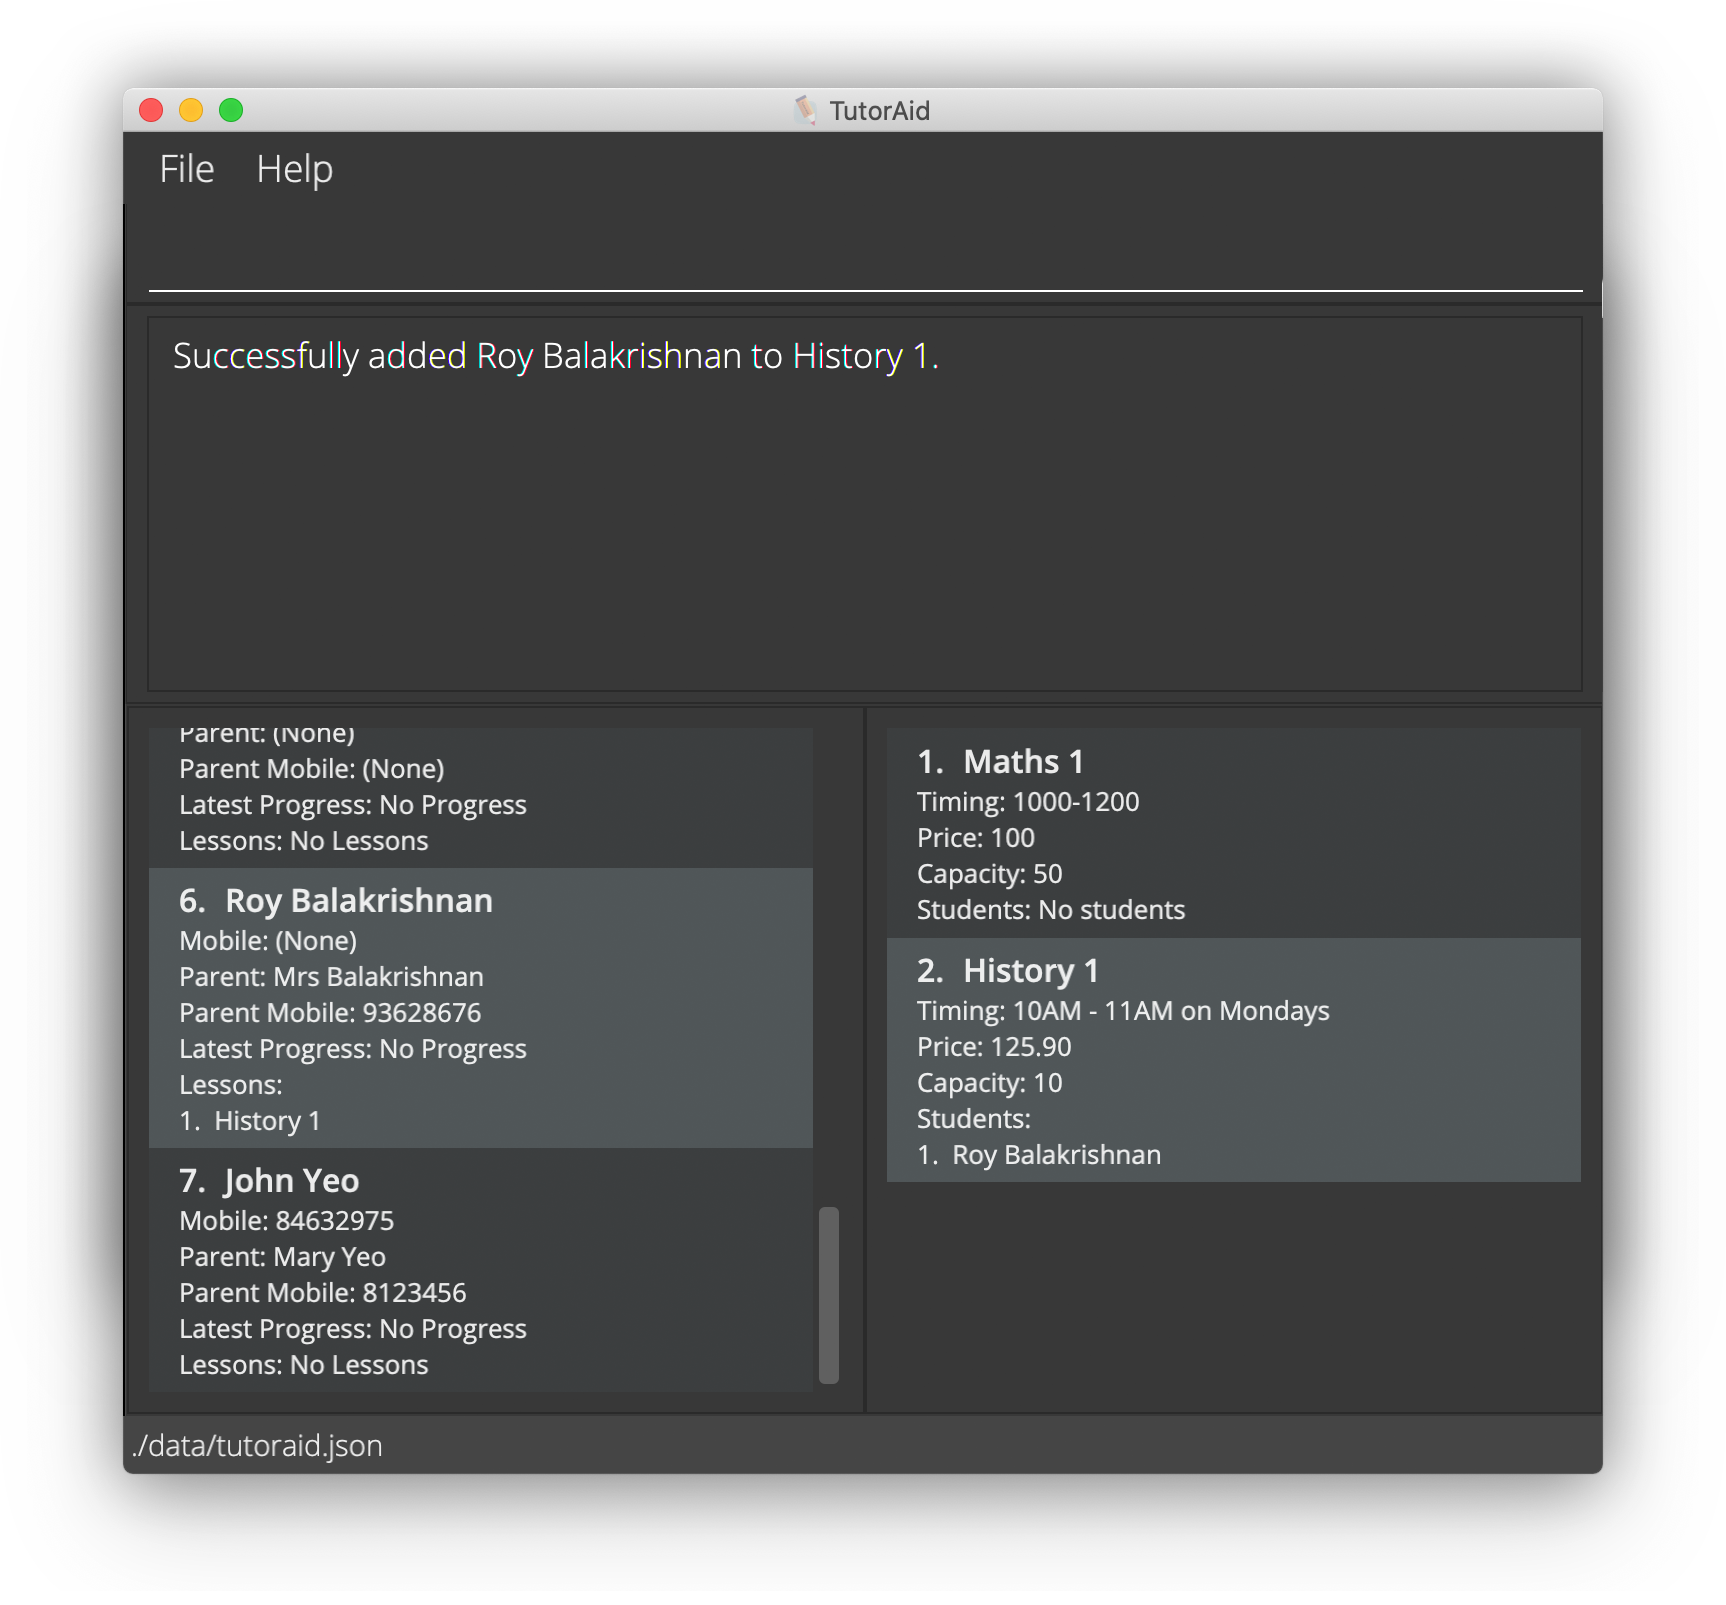
Now that you have set up the lesson History 1, let us add one of your existing students who wishes to enrol in the class, Roy Balakrishnan. You can do this in TutorAid by following the steps below:
-
Key in
add -sl s/6 l/2into the Command Box and press ENTER. The numbers 6and2in the command above refer to the indexes of Roy and History 1 in the Student and Lesson Panels respectively. For more information, you can refer to the detailed documentation for adding a student to a lesson. -
As shown in the image below, you should now be able to see that in the Student Panel, the lesson History 1 has been added to the list of lessons taken by Roy. Similarly, in the Lesson Panel, Roy has been added to the list of students attending History 1.
4.4: Adding a progress entry for a student
Now, imagine you have ended your Maths 1 lesson (The 1st lesson in displayed in the Lesson Panel). You realised that one of your students, Alex Yeoh, seems to struggle with the topic ‘Vectors’, and you wish to take note of it so that you can provide him with extra practice. To do so, you can easily add a progress entry for Alex on TutorAid through the following:
-
Key in
add -p 1 Requires extra practice for Vectorsinto the Command Box and press ENTER. The 1in the command above refers to the index number of Alex Yeoh in the Student Panel. For more information, you can refer to the detailed documentation for the ‘Add a Progress to a Student’ command. -
Notice that Alex’s details reflected in the Student Panel have updated to display the progress entry you just added, as seen here:

You can then key in the
list -ainto the Command Box and hit ENTER to if you wish to change back to your original view.
Now, the next time you open TutorAid, you will be able to see Alex’s latest progress entry at a glance!
4.5: Deleting a student
Lastly, imagine that your student, Alex Yeoh, has graduated from secondary school and wishes to discontinue his lessons. Since he is no longer your student, you would like to remove his details from TutorAid. You can easily delete his data from TutorAid by completing the following operations:
-
Type
del -s 1into the command box. The 1in the command above refers to the index number of Alex in the Student Panel. For more information, you can refer to the detailed documentation for the Delete a Student command. -
Upon pressing ENTER, all of Alex’s details will be removed from TutorAid. Observe how Alex’s details are not found in the Student Panel and that his name has been removed from the student list for the Maths 1 in the Lesson Panel:

4.6: Next Steps
Congratulations on successfully completing TutorAid’s beginner’s tutorial ![]()
But why quit now? Since you have completed the tutorial, you can go ahead and key in clear in the Command Box to remove all the sample data and to add in a few of your own students and lessons!
You can also learn and experiment with a few other TutorAid commands that we have not covered in the tutorial. You may find the following commands particularly handy:
- Changing the viewing modes
- Deleting a student from a lesson
- Deleting a progress entry from a student
- Finding a student by name
- Finding a lesson by name
All the commands available in TutorAid are listed below in Features section for your reference. Happy Learning! ![]()
5. Features
If you are new to TutorAid, we hope that you have gone through the Beginner’s Tutorial to gain a better understanding on how TutorAid can help to ease your tutoring tasks! This section lists all the available commands in TutorAid for your reference.
The commands can be split into 4 main categories: Student commands, Lesson_ commands, Student and Lesson commands and Other commands. This section will also be split into these 4 sub-sections for easier navigation.
For more information about how to interpret any of the commands, you check out the Command Format and Command Syntax sections.
5.1 Student Commands
Adding a student: add -s
If a new student has just enrolled in one of your tuition lessons, you can use this command to add in the students’ contact details to TutorAid. This allows you to easily keep track of all of your students contact details in just one place.
Format: add -s sn/STUDENT_NAME [sp/STUDENT_PHONE] [pn/PARENT_NAME] [pp/PARENT_PHONE]
Examples:
-
add -s sn/John Does sp/81234567 pn/Mrs Doe pp/91234567adds a student with nameJohn Does, student phone number81234567, parent’s nameMrs Doeand parent’s phone number91234567. - The student’s phone number, parent’s name and parent’s phone number are optional details for you to include.
- Names can only contain alphanumerical characters and spaces.
- Phone numbers can only contain digits 0-9 and should not contain any spaces.
- Phone numbers must be minimally 3 digits long.
Deleting a student: del -s
If a student no longer requires your tutoring services and you no longer wish to hold on to his/her details, you can use this command to remove the student’s details from TutorAid. This allows you to keep your list of students up-to-date in TutorAid at all times.
Format: del -s STUDENT_INDEX
- Deletes the student at the specified STUDENT_INDEX.
- The index refers to the index number shown in the Student Panel.
- The index must be a positive integer 1,2,3, …
Example:
-
del -s 2deletes the 2nd student displayed in the Student Panel from TutorAid.
Editing a student: edit -s
If student’s phone number or his/her parent’s details have changed, you can use this command to quickly make the necessary changes to the student’s contact. This helps in ensuring that all of your students’ details are up-to-date in TutorAid at all times.
Format: edit -s STUDENT_INDEX [sn/STUDENT_NAME] [sp/STUDENT_PHONE] [pn/PARENT_NAME] [pp/PARENT_PHONE]
- Edits the student at the specified STUDENT_INDEX.
- The index refers to the index number shown in the Student Panel.
- The index must be a positive integer 1,2,3, …
- At least 1 of the 4 optional fields must be present.
Example:
-
edit -s 2 pp/91112222updates the parent contact number of the 2nd student displayed in the Student Panel to 91112222.
Viewing a student: view -s
You can use this command if you would like to view all the details of a particular student in full. TutorAid would then display the specified student’s name, phone number, parent’s name, parent’s phone number, progress entries and lessons.
Format: view -s STUDENT_INDEX
- Display details of the student at the specified STUDENT_INDEX.
- Display details of the lessons the student at the specified STUDENT_INDEX has.
- The index refers to the index number shown in the Student Panel.
- The index must be a positive integer 1, 2, 3, …
Example:
-
view -s 2shows the details associated with the 2nd student displayed in the Student Panel.
Finding students by name: find -s
You can use this command to easily find a student by his/her name in TutorAid. This allows you to conveniently perform certain operations on a student without having to scroll through a long list of students, such as when you need to view or edit a student’s contact details.
Format: find -s KEYWORD...
- The search is case-insensitive. e.g.
hanswill matchHans - The order of the keywords does not matter. e.g.
Hans Bowill matchBo Hans - Only the name is searched.
- Partial keywords will be matched e.g.
Hanwill matchHans - Persons matching at least one keyword will be returned (i.e.
ORsearch). e.g.Hans Bowill returnHans Gruber,Bo Yang
Examples:
-
find -s Johnreturnsjohn,John DoeandJohnny Liu -
find -s alex davidreturnsAlex YeohandDavid Li
Adding progress for a student: add -p
If you would like to keep track of a student’s progress and performance in your lesson, you can use this command to quickly add some remarks for the student in TutorAid at the end of each session. In the long run, you will be able to easily keep track of a students’ progress and this can be especially helpful when you need to update parents on their children’s performance during your lesson.
Format: add -p STUDENT_INDEX PROGRESS
- Adds
PROGRESSfor the student at the specifiedSTUDENT_INDEX. - The index refers to the index number shown in the Student Panel.
- The index must be a positive integer 1, 2, 3, …
- Up to 10 progress entries can be added for each student. If a 11th progress entry is added, the oldest entry will be deleted before adding the new entry to the student.
Examples:
-
add -p 2 completed homeworkaddscompleted homeworkto the 2nd student displayed in the Student Panel.
Deleting progress from a student: del -p
If you made an error in adding your last progress entry for a student or would simply like to remove the latest progress entry from TutorAid, you can use this command to do so.
Format: del -p STUDENT_INDEX
- Deletes the most recently added
PROGRESSfrom the student at the specifiedSTUDENT_INDEX. - The index refers to the index number shown in the Student Panel.
- The index must be a positive integer 1, 2, 3, …
Examples:
-
del -p 2deletes the latest progress of the 2nd student displayed in the Student Panel.
5.2 Lesson Commands
Adding a lesson: add -l
If you have just set up a new lesson, you can add its details to TutorAid so that you can keep track of all your lessons in just one place.
Format: add -l n/LESSON_NAME [c/LESSON_CAPACITY] [p/LESSON_PRICE] [t/LESSON_TIMING]
- The lesson’s capacity, price and timing are optional details for you to include.
- The lesson name should only contain alphanumeric characters and spaces.
- If provided, the lesson’s capacity must be a positive integer 1, 2, 3, …
- If provided, the lesson’s price must be a non-negative number with either 0 or 2 decimal places. Examples of a valid price are
80and85.50. - The lesson’s timing can be anything you want - you could use it to remind yourself what time your lesson is, but you can use this space for any remarks or reminders you may have.
Examples:
-
add -l n/P6 Maths c/20 p/80 t/Monday 1200-1400adds a lesson with nameP6 Maths, capacity of20 students, price of$80and timingMonday 1200-1400.
Deleting a lesson: del -l
If you are no longer planning on continuing to conduct a particular lesson, you can easily remove its details from TutorAid so as to only keep track of your active lessons.
Format: del -l LESSON_INDEX
- Deletes the lesson at the specified
LESSON_INDEX. -
LESSON_INDEXrefers to the index number shown in the Lesson Panel. -
LESSON_INDEXmust be a positive integer 1,2,3, …
Examples:
-
del -l 3deletes the 3rd lesson displayed in the Lesson Panel from TutorAid.
Editing a lesson: edit -l
If there are any changes to your lessons, such as a change in lesson timing or lesson fee, you can use this command to quickly register these updates in TutorAid as well.
Format: edit -l LESSON_INDEX [n/LESSON_NAME] [c/LESSON_CAPACITY] [p/LESSON_PRICE] [t/LESSON_TIMING]
- If provided, the lesson name should only contain alphanumeric characters and spaces.
- If provided, the lesson’s capacity must be a positive integer 1, 2, 3, …
- If provided, the lesson’s price must be a non-negative number with either 0 or 2 decimal places. Examples of a valid price are
80and85.50. - The lesson’s timing can be anything you want - you could use it to remind yourself what time your lesson is, but you can use this space for any remarks or reminders you may have.
- At least 1 out of 4 optional fields must be provided.
list -acommand.
Examples:
-
edit -l 1 c/20 p/80updates the 1st lesson’s capacity to20 studentsand price to$80
Viewing a lesson: view -l
You can use this command if you would like to view a particular lesson’s details in full. TutorAid would then display the specified lesson’s name, capacity, price, timing and names of students enrolled in this lesson.
Format: view -l LESSON_INDEX
- Display details of the lesson at the specified LESSON_INDEX.
- Display details of the students that have the lesson at the specified LESSON_INDEX.
- The index refers to the index number shown in the Lesson Panel.
- The index must be a positive integer 1, 2, 3, …
Example:
-
view -l 2shows the details associated with the 2nd lesson displayed in the Lesson Panel.
Finding lessons by name: find -l
You can use this command to easily find a lesson by its name in TutorAid. This allows you to conveniently perform certain operations on a lesson without having to scroll through a long list of lessons, such as when you need to view or edit a lesson’s details in TutorAid.
Format: find -l KEYWORD...
- The search is case-insensitive. e.g.
mathwill matchMath - The order of the keywords does not matter. e.g.
Math Upperwill matchUpper Math - Only the name is searched.
- Partial keywords will be matched e.g.
Sciwill matchScience - Lessons matching at least one keyword will be returned (i.e.
ORsearch). e.g.Mathematics Upperwill returnMathematics Lower,Math Upper
Examples:
-
find -l mathsreturnsmaths,Maths 1andMathematics
5.3 Student and Lesson Commands
Listing all students and lessons: list
If you would like to change your current viewing mode on TutorAid to either display more or display fewer details of each student and lesson, you can use these commands to do so.
Format: list [-a]
Examples:
-
listdisplays all students and lessons in TutorAid by only showing their names and list indexes. -
list -adisplays all students and lessons in TutorAid while showing all of their fields’ data.
Adding student(s) to lesson(s): add -sl
If a new student has just enrolled in one of your lessons, you can use this command to add the student into the lesson in TutorAid as well. This will ensure that the student list for each lesson are up-to-date at all times and can be helpful when you need to know who is attending a specific lesson.
Format: add -sl s/STUDENT_INDEX... l/LESSON_INDEX...
- Adds every specified student to every specified lesson.
- The index refers to the index number shown in the displayed student list and lesson list.
- The index must be a positive integer 1, 2, 3, …
- Minimally the indexes of 1 student and 1 lesson must be provided.
Examples:
-
add -sl s/1 2 3 l/2adds the students with indexes 1, 2 and 3 into the lesson with index 2.
Deleting student(s) from lesson(s): del -sl
If a student has just dropped out off one of your lessons, you can use this command to remove the student from the specific lesson in TutorAid as well. This will ensure that the student list for each lesson are up-to-date at all times and can be helpful when you need to know who is attending a particular lesson.
Format: del -sl s/STUDENT_INDEX... l/LESSON_INDEX...
- Removes every specified student from every specified lesson.
- The index refers to the index number shown in the displayed student list and lesson list.
- The index must be a positive integer 1, 2, 3, …
- Multiple indexes are allowed for both students and lessons if you would like to remove multiple students from multiple lessons at one go.
Examples:
-
del -sl s/1 2 3 l/1deletes the students with indexes 1, 2 and 3 from the lesson with index 1.
5.4 Other Commands
Viewing help: help
If you have forgotten how to use a few of the features offered by TutorAid, you can use this command to open up an offline help guide that details the usages and formats of every available command in TutorAid, as shown below:

This is especially helpful if you do not have an internet connection to refer to the online TutorAid user guide.
Format: help
Clearing all entries: clear
If you would like to delete ALL of the existing data on your students and lessons stored in TutorAid and start fresh, you can use this command to remove all the data from TutorAid.
Format: clear
Exiting the program: exit
You can use this command when you are done using TutorAid for the moment and would like to exit the application.
Format: exit
5.5 Saving and Editing Data
Saving the data
All TutorAid data are saved in your hard disk automatically after you enter any command that changes the data. Thus, there is no need for you to save the data manually.
Editing the data file
TutorAid student data are saved as a JSON file [JAR file location]/data/tutorAidStudents.json, while TutorAid lesson data are saved as a JSON file [JAR file location]/data/tutorAidLessons.json. If you are an advanced user, you are welcome to update your data directly by editing any of the two data files.
6. Glossary
- CLI: CLI (also known as a Command Line Interface) refers to a form of interface that processes a user’s input in the form of text.
- GUI: GUI (also known as a Graphical User Interface) refers to a form of user interface that allows user to interact with the application through graphical icons, such as buttons.
- Progress: Refers to any remark you may want to add for a specific student, such as their performance in lesson or their homework progression.
7. FAQ
Q: How do I transfer my data to another Computer?
A: Install the application in the other computer and overwrite the empty data files it creates with the files that contains the data of your previous TutorAid home folder.
Q: I am currently only able to view my students’ latest progress entry, how can I view all the entries?
A: To view all the progress entries of a student, you can key view -s STUDENT_INDEX into the Command Box and hit ENTER. You should be able to see you 10 most recently added progress entries. Please note that you will not be able to view all the progress entries of multiple students at any one time.
Q: I just added a new progress entry for one of my students, and all my other students and lessons have disappeared. How do I view them again?
A: To return back to the original view of all students and all lessons, simply key in list -a into the Command Box and hit ENTER.
Q: I have added more than 10 progress entries for a student. Why am I only able to see up to the 10 most recent entries?
A: TutorAid only supports storing up to 10 progress entries so that it is easier for tutors to manage and view all of their entries for each student.
8. Command Summary
8.1 Student Commands
| Action | Format and Examples |
|---|---|
| Add student |
add -s sn/STUDENT_NAME [sp/STUDENT_PHONE] [pn/PARENT_NAME] [pp/PARENT_PHONE] e.g., add -s sn/John Does sp/81234567 pn/Mrs Doe pp/91234567
|
| Delete student |
del -s STUDENT_INDEXe.g., delete 3
|
| Edit student |
edit -s STUDENT_INDEX [sn/STUDENT_NAME] [sp/STUDENT_PHONE] [pn/PARENT_NAME] [pp/PARENT_PHONE]e.g., edit -s 2 pp/91112222
|
| View student |
view -s STUDENT_INDEXe.g., view -s 2
|
| Find student |
find -s KEYWORD...e.g., find -s roy
|
| Add Progress |
add -p STUDENT_INDEX PROGRESS e.g., add -p 2 completed homework
|
| Delete Progress |
del -p STUDENT_INDEX e.g., del -p 2
|
8.2 Lesson Commands
| Action | Format and Examples |
|---|---|
| Add lesson |
add n/LESSON_NAME [c/LESSON_CAPACITY] [p/LESSON_PRICE] [t/LESSON_TIMING]e.g., add -l n/P6 Maths c/20 p/80 t/Monday 1200-1400
|
| Delete lesson |
del -l LESSON_INDEX e.g., del -l 3
|
| Edit lesson |
edit -l LESSON_INDEX [n/LESSON_NAME] [c/LESSON_CAPACITY] [p/LESSON_PRICE] [t/LESSON_TIMING]e.g., edit -l c/20 p/80
|
| View lesson |
view -l LESSON_INDEXe.g., view -l 2
|
| Find lesson |
find -l KEYWORD...e.g., find -l maths
|
8.3 Student and Lesson Commands
| Action | Format and Examples |
|---|---|
| List |
list [-a]e.g., list, list -a
|
| Add student(s) to lesson(s) |
add -sl s/STUDENT_INDEX... l/LESSON_INDEX...e.g., add -sl s/1 2 3 l/1 2
|
| Delete student(s) from lesson(s) |
del -sl s/STUDENT_INDEX... l/LESSON_INDEX...e.g., del -sl s/2 3 l/1 2 3
|
8.4 Other Commands
| Action | Format and Examples |
|---|---|
| Help | help |
| Clear | clear |
| Exit | exit |